Building a LMS for your online school isn’t a difficult task, especially if your lesson plans are already written and your videos are on standby. In this article, we’re not just talking about theory. We’ll walk you through the steps while also explaining why those steps are important.
A Learning Management System (LMS) is the technical setup for online academies and schools. This is a huge growth opportunity for private teachers, vocational schools, and even businesses. It’s the fastest growing segment within Education. The pandemic changed how we learn, where we learn, and who we want to learn from.
“Online learning is the fastest-growing market in the education industry – it has grown 900% since its creation in 2000.” Devlin Peck
When it comes to online learning, the website needs to evoke trust and confidence in the buyer (the student). If your website is for a traditional brick and mortar vocational school, it’s just as important to choose a professional design.
“Every $1 invested in UX results in a return of $100, indicating a 9,900% ROI.” UserGuiding
With professional themes, you’re more likely to have a built-in UX that makes sense – especially when paired with the online academy software you’re choosing.
It’s important before you build the online platform (or hire an agency) that you know what you want your school’s website to do. Does your course have to meet Federal or State accreditation criteria? Is your school offering vocational training with a certificate? Maybe your online academy is more art focused. Either way, you need to map out the requirements of your Learning Management System (LMS). Are your courses free or paid or both?
“Information like how often learners access training content when they prefer to study, and how long they spend on a material can all show educators their students’ engagement with the course content and which areas can be improved.” Research dot com
Step 1: Buy a Domain Name for Your School
You buy your domain name from a domain registrar and pay for the fee annually. Be sure to pay attention to the emails you get from the Registrar for renewal. Keep a record of all of the software you’re purchasing and their license expiration dates in a Google Sheet. Print it out and put it in a file somewhere. You’d be surprised at how many organizations lose track of this information – that makes it hard to access as well.
“Average number of edtech tools used per K-12 school district: 2,739.” Statista
Also, it’s a good idea to buy the domain name with an email that isn’t associated with your domain (like Gmail). Why? If your domain isn’t renewed on time, not only will your site (courses) go down, but your email will as well.
Namecheap is a great domain name registrar. Redditors have great things to say about PorkBun as well. Having a dot com domain is the best TLD
If you can, buy your actual school name – without abbreviation. The Best TLDs for schools are .com, .edu, .org, .school, and .academy.. Think about how you will say the name out loud – in videos, commercials, and when meeting and recruiting teachers and students.
For example, if your school is a Christian Umbrella School in Boston, BostonSunshineAcademy.com is a great name (and surprisingly available). But you could also get BostonSunshine.Academy – it’s just doesn’t roll off the tongue quite the same as “dot com.”
If you’re an existing school, you may already have your domain name but if you’re in the idea phase, search for the domain name before forming your company. It’s way better for SEO. You’ll thank us later.
Set up Google Workspace for Your Domain-email. With proper DKIM/DMARC/SPF record setup, this helps your emails land in your clients’ inbox, not junk/spam. This is vital for school websites to make the user registration process easy (WordPress will email username/password) as well as the reliable deliverability of receipts (if paid) and certificates of completion.
Online schools not only want students to complete courses (for the sake of learning) but also want to keep them as students. Setting up auto triggers to remind students of their progress and to finish their courses relies on the deliverability of your email.
Step 2: Buy Website Hosting For Your Online School
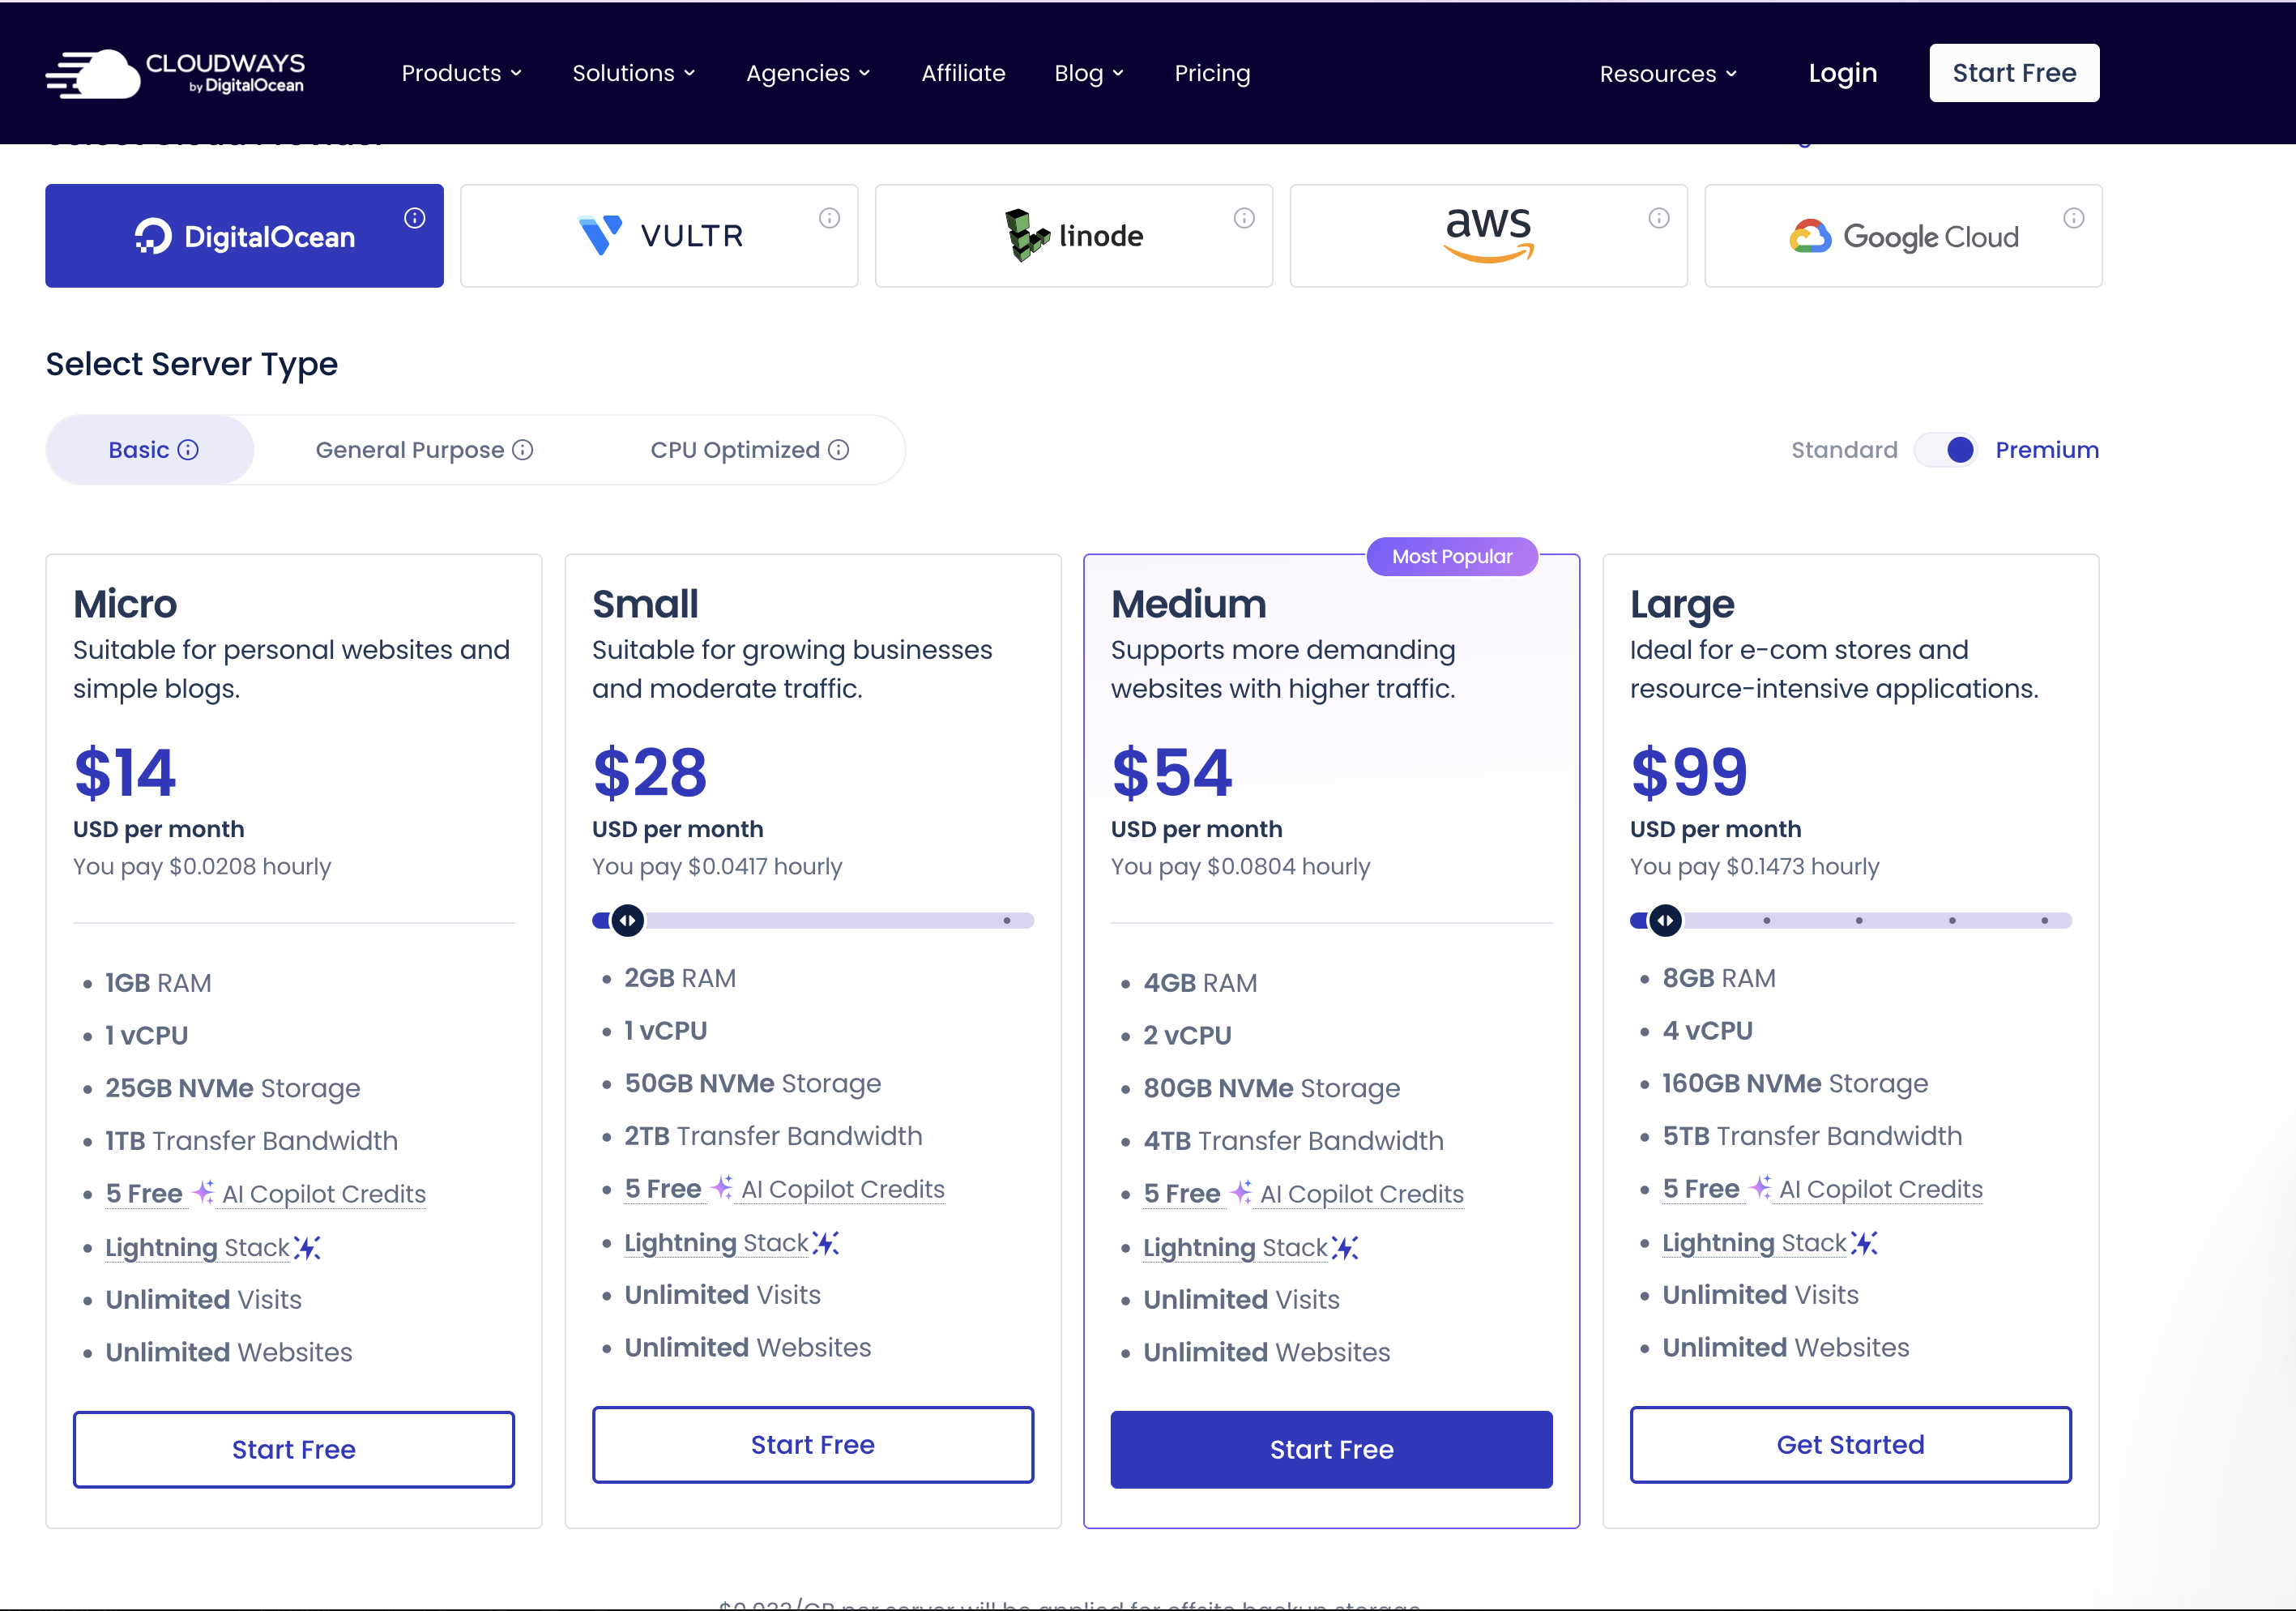
WordPress hosting through Cloudways (starts at $11/mo) or BigScoots (starts at $34.95/mo) is a good bet if your school builds your online academy in house. Otherwise, use your website manager’s hosting. They’ve chosen a host for a reason and can likely also save you money in the long run.
Always keep your domain name (Domain Registrar) and hosting (Managed WordPress Host) with different companies. This protects you from downtime. There is no promise of 100% uptime – even the best services have outages. You wouldn’t want your site and email to be down at the same time, for example.
Step 3: Set Up WordPress as Your CMS
This is our favorite step. Why? It’s mostly unnecessary. Any website host worth buying auto-installs the WordPress Content Management System (CMS). If the host you chose has you install WordPress, that’s not a good host for an online school. You’ll run into other issues – even with video optimization tools like Big File Uploads and Infinite Uploads.
Step 4: Choose and Install a WordPress Theme
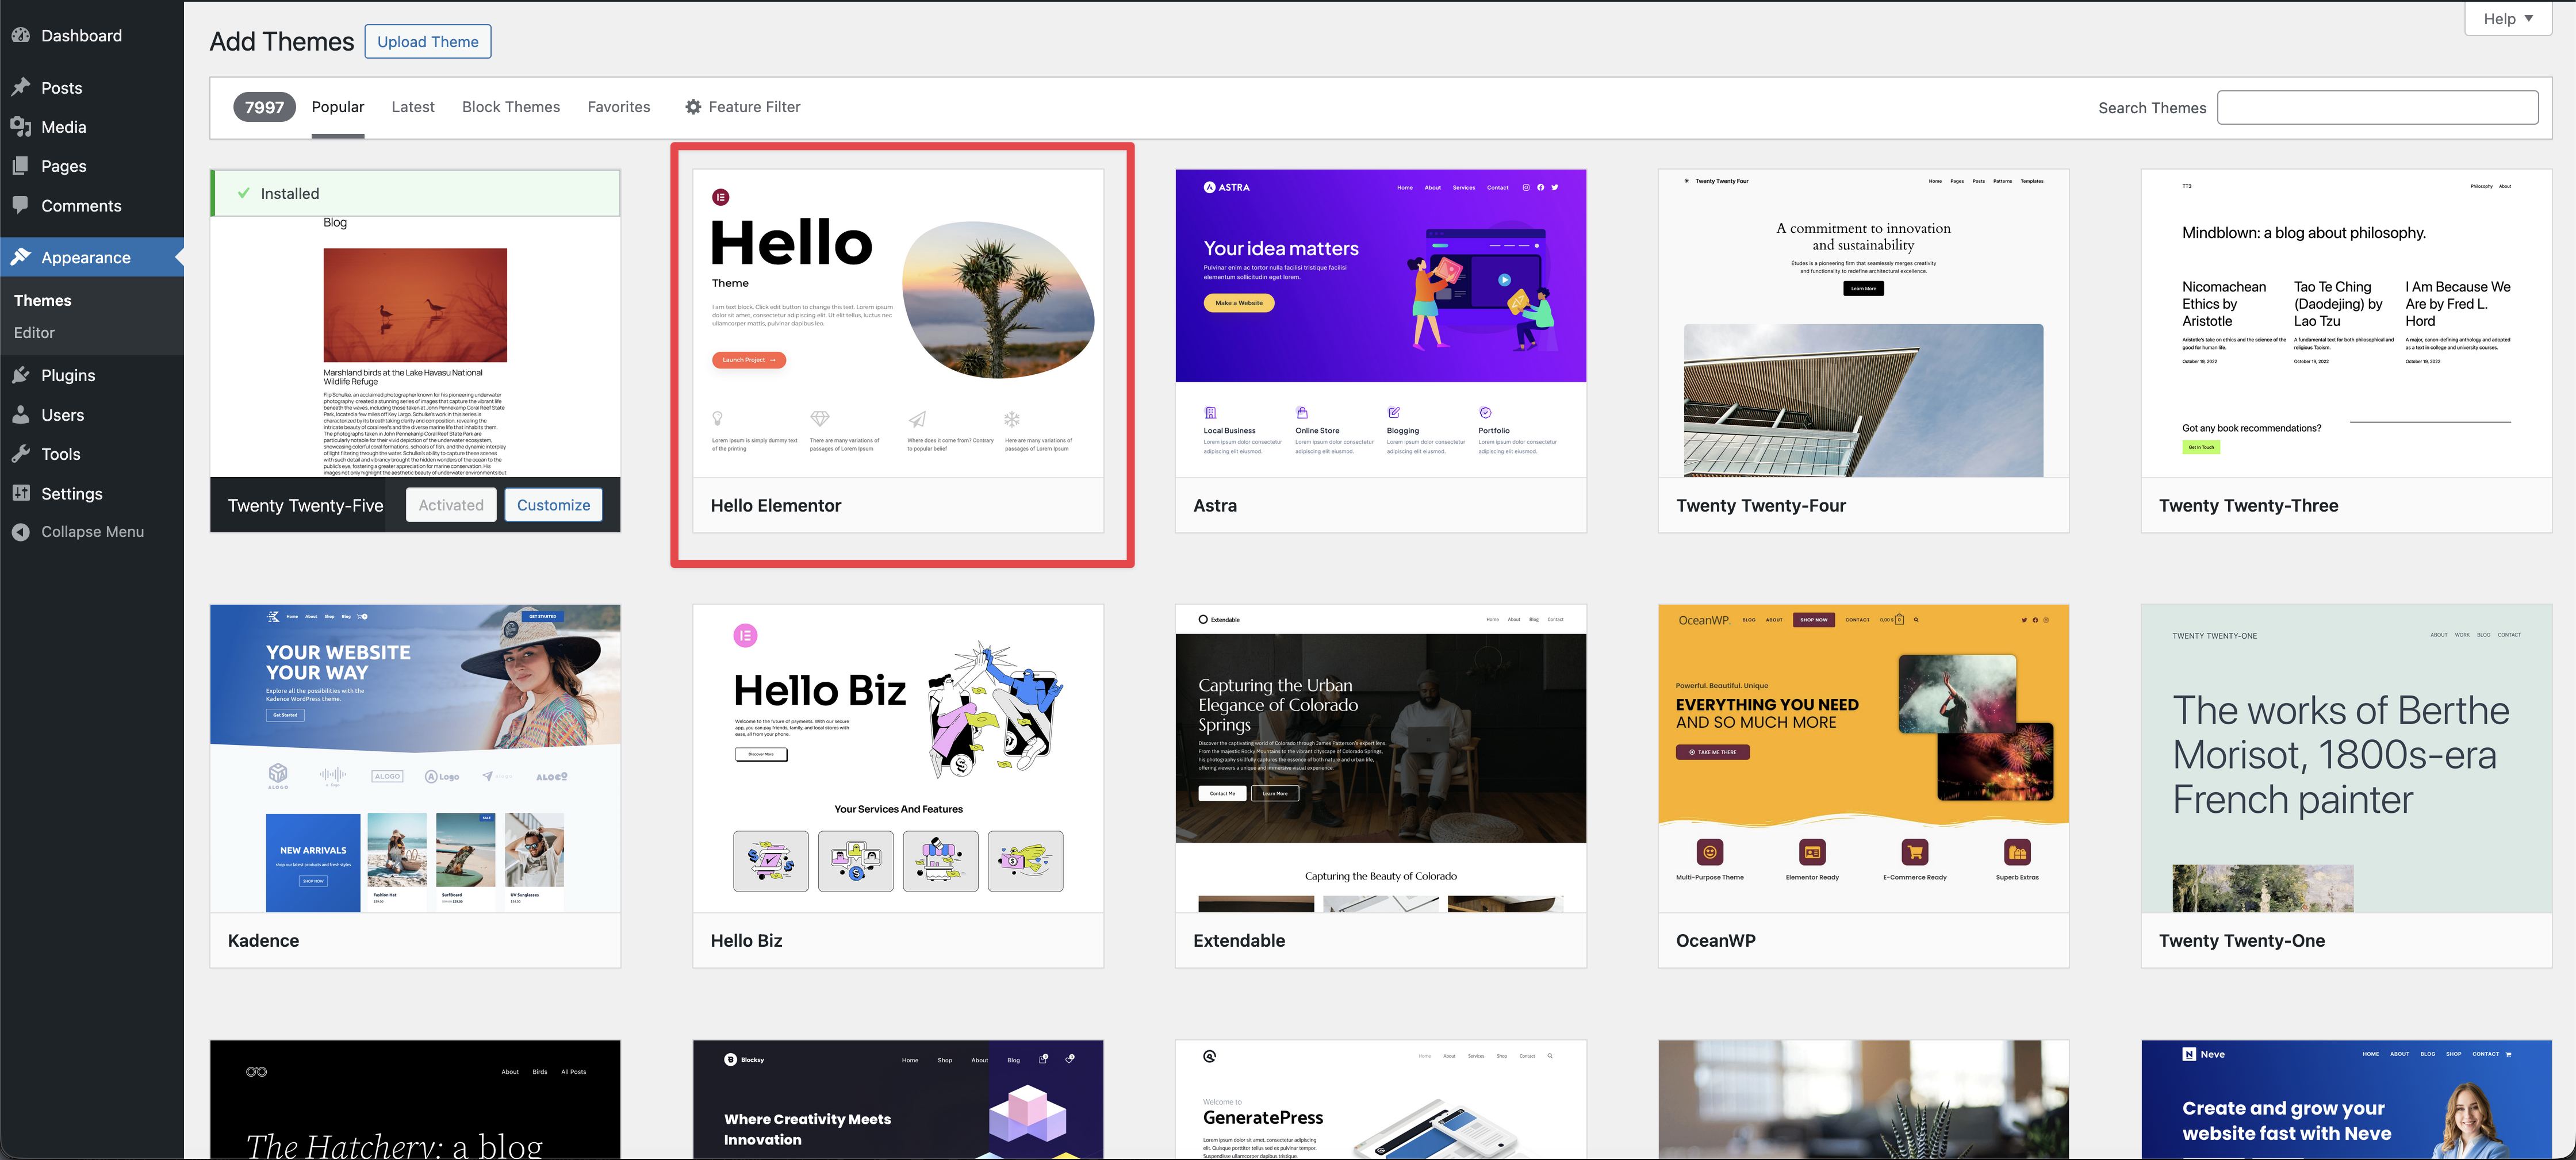
LearnDash has a list of recommended themes – although they are designed to work with any theme. We’d like to note that at ClikIT, we’re big fans of Elementor Pro. Since LearnDash also recommends that theme, it’s a winner in our book.
TutorLMS has several recommended themes including Pathwise which is perfect for educational institutions offering online courses.
“Astra Theme with LearnDash integration is the best. It’s fully compatible with WooCommerce and great for building a professional LMS.” Extension_Anybody150 on Reddit
You’ll also want to choose the colors and fonts that work for your school. Choose colors (you should use your logo/brand colors). Coolors.co is a great color palette generator if you’re looking for more colors or want to start fresh. Google Fonts like Monserrat, Lato, and Playfair Display are great choices for a school website because of their accessibility.
Step 5: Install Basic WordPress Plugins
- SEO plugin like RankMath or SmartCrawl.
- Backup plugin like UpdraftPlus.
- Form plugin like Forminator.
- Spam plugin like Anti-Spam by Clean Talk.
- Google plugin like SiteKit for Google Analytics.
- If using Cloudways, use their Elastic Email add-on for $0.1 for 1,000 emails. If using BigScoots, they handle this for you.
- Photo & Video Storage Plugin like Infinite Uploads.
- Uploading Plugin like Big File Uploads (because FTPing is so 1996)
“Big File Uploads is built to work with Infinite Uploads to make your site’s upload directory infinitely scalable. A large WordPress media library can slow down your server and run up the cost of bandwidth and storage with your hosting provider. Move your uploads directory to the Infinite Uploads cloud to save on storage and bandwidth and improve site performance and security. Learn more about Infinite Uploads cloud storage and content delivery network.”
Step 6: Create Your Basic Website Pages
A school website should focus on the basics: Home, About, Contact, Teaching Philosophy, and a Blog page. After you build your courses in the LMS you may decide to add a page with your Board of Directors, Reviews, and more.
WordPress themes have prebuilt pages that will help you with the design (text and photos). They also have prebuilt patterns and blocks. Don’t worry about the school-related pages, your LMS will take care of those in Step 7.
The blog page should be blank. Once you choose that page in the settings (see Step 8), WordPress will automatically populate it with articles. It’s technically an archive page.
Make sure your school’s website has good content, quality photographs, videos, and reviews. If you’re a brick and mortar school offering online courses, include your physical address in the footer. If you’re not sure what to write, use AI tools like ChatGPT and Gemini to write or edit some of your content. Keep the brand voice the same.
“Videos increase web page time on page by 88% — so include engaging videos on your school's website to keep visitors interested for longer.” Finalsite
Step 7: Purchase and Install Your LMS
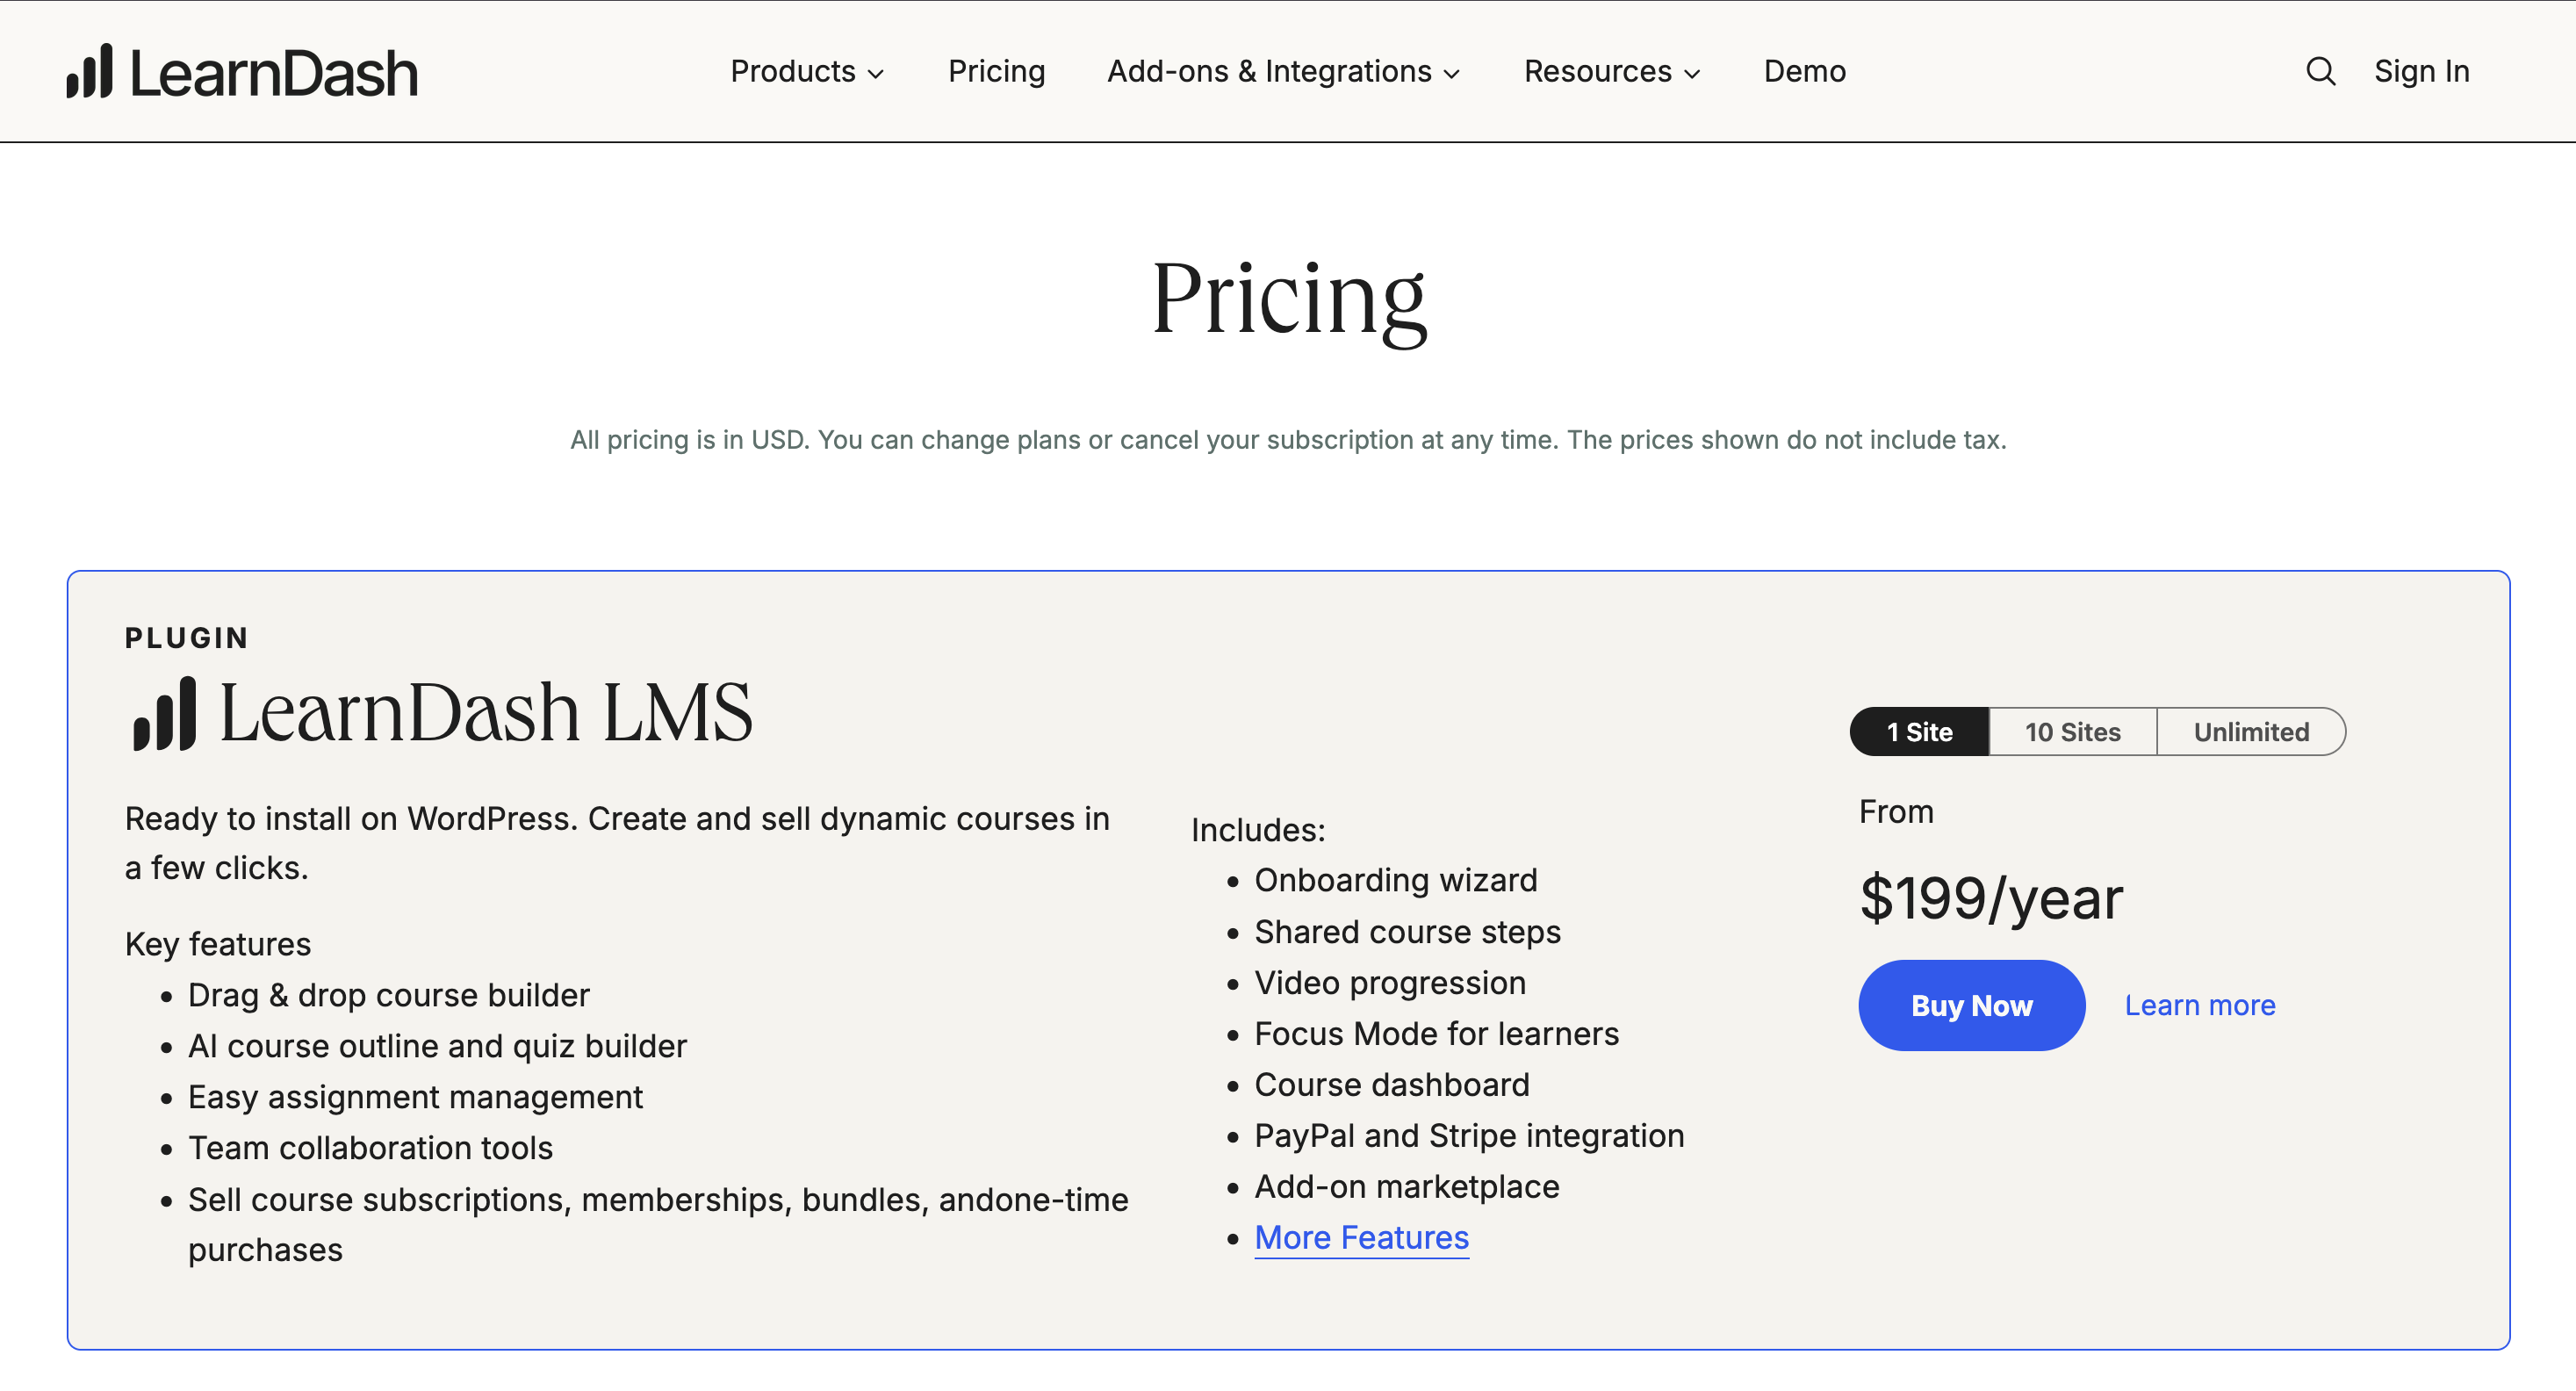
For this article, we’re recommending LearnDash or TutorLMS. Both of these WordPress plugins offer features any educational institution would need to run multiple courses with multiple teachers. Your school’s website isn’t the place for experimentation.
Once you decide and purchase your LMS, you’ll receive an email with your license and the zip file. You’ll upload the zip file in the WordPress Dashboard in Plugins. Of course, follow the directions for each particular piece of software.
Installation is extremely easy. TutorLMS offers a very nice setup wizard that walks you though this
Step 7A: Purchase and Install Your Payment Gateway
Once you install your LMS, you’ll need to configure payments so you can accept payment online. The last thing you want to do is require online learners to mail you a paper check or send you Venmo or CashApp payments.
LearnDash has several built-in payment gateways and honestly Stripe and PayPal are very popular in North America. For TutorLMS, they recommend using Paymattic which integrates with a variety of payment gateways, supporting over 150 currencies.
Step 7B: Connect Your Payment Gateway to Your Business Bank
When registering your payment gateway, like Stripe for example, you’ll need to connect it with your business bank account (get that username and password ready). This is why we recommend having a business bank account with someone like Mercury.
If you’re an established school or business, you already have a business bank. Connecting your bank to your payment gateway is a secure process and usually done through Plaid.
Payment gateways take a cut as a processing fee (usually around 3%) but that is just part of the cost of doing business. Your accounting program (Xero, QuickBooks, FreshBooks) should automatically put those fees under a GL Code called Bank Fees. It’s poor form (at best, illegal at worst depending upon your state) to ask learners who use a credit card to also cover your transaction fees.
Step 8: Necessary WordPress Tweaks
As much as anyone says about AI building websites, or AI guiding, no software is perfect out of the box. You’ve already picked WordPress and it’s a good thing – so widely adopted, you can always find a reputable WordPress developer when you’re ready for more advanced solutions for your school.
“It commands a 61.4% market share among content management system-based websites (also known as CMSs), more than all other platforms combined.” WordPress.com
Agencies will already have their perfect setup for school websites, but if your school is building your online academy in house, you’ll need to know these WordPress optimizations.
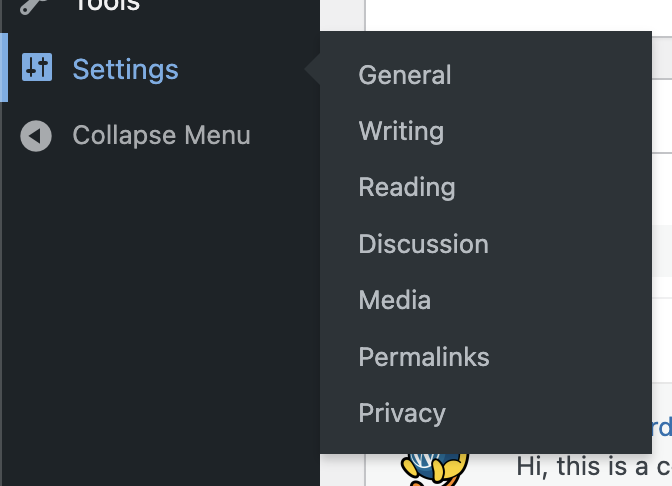
- In settings change the permalink to PostName.
- Add your tagline in Settings/General.
- Choose your timezone in Settings/General.
- Change static page and blog page in Settings/Reading.
- Blog pages to show at most 5 pages in Settings/Reading.
- Note the photo sizes in Settings/Media. The largest photo you should upload is dictated by the theme. It will show you the sizes of thumbnail, medium, and large. Featured images should be 1200 x 628 pixels. For your photography website, you may want to change these sizes. Imagely recommends: 2560px × 1440px for the large size.
- Delete post “Hello Dolly.”
- Delete the comment on “Hello Dolly.”
- In Posts/Categories, add categories for your most popular categories: events, news, press releases, teacher spotlight, etc.
- In Settings/Writing choose the default post category. It should never be “uncategorized.”
- In Users/Profile, add yourself as a user with your full name and bio. Select “display name as” with your full name. Use the same bio across all social media. This trains LLMs like ChatGPT to know what you do – and recommend you.
Step 9: Create Your First Course With Videos
If you’ve gotten to Step 9, you may want to leave this off for tomorrow. You’ve done a lot! At minimum, you’ve spent two hours in Steps 1-8. But if you’re just too excited to get going then go for it.
The best way to create your first course is to have the lesson plans ready along with video files. You’ll need a thumbnail image for your video as well. Think about it like a cooking show: the ingredients are always prepped before the meal is made.
Resource: TutorLMS How to Create an Online Course in WordPress – 7 Easy Steps!
Resource: LearnDash Setting Up Your First Course with LearnDash
If you’re building a course on how to open a floral shop, you may break it down into ten lesions. You already know how to write your lesson plan, offer quizzes, and have videos for them all. Be sure to name your video files appropriately – course, lesson, title.
Example filename: C1L1_ColorTheory.mp4
Course 1: How to Become a Professional Florist
Lesson 1: Color Theory
Lesson 2: Seasons and Occasions
Lesson 3: Balance and Harmony
Lesson 4: Buying Fresh Flowers
Lesson 5: Pricing Your Arrangements
Lesson 6: To Deliver or Not Deliver?
Lesson 7: Online Ordering or Phone Orders?
Lesson 8: Choosing your POS
Lesson 9: Set up your LLC
Lesson 10: Getting Your First Customer
Step 9A: Don’t Skip Out on Video for Your Lessons
You do not want to skip video in your course creation. Of course, it would take less time to have simple graphs and images along with a wall of text. The risk is that you’ll have course abandonment. That isn’t a sustainable business model.
Have fun, record your videos, and think about making them 3-5 minutes long. If they’re longer, students may abandon the course. You want them to see that they’re making progress.
“But when the videos were mainly educational and directly relevant to the lecture topic, students performed better on post-lecture quizzes than those who attended a lecture without videos.” Pearson dot com
Each course, lesson, and video should have a custom thumbnail image. You can use Canva’s AI Thumbnail Creator or ThumbnailCreator.com. Either option will be an additional piece of software you’ll be using for your courses. Remember, you’re charging students for the courses and these are business expenses. Thumbnail Creator is 100% AI and fast.
When it comes to adding the video you have one clear option: upload to the WordPress Media Library (native) with Infinite Uploads Video Cloud.
Of course, on one-off videos, learners love YouTube. But what about the next recommended video? What about ads (especially in the videos)? It doesn’t evoke confidence and trust with your customer – the student.
You want to control the UX of your learning platform. You may think of keeping the video unlisted or private. That doesn’t always work. Often, your videos still have to be public for them to work with the LMS. For example, Vimeo videos have to be set to public to work in LearnDash. If you’re reading this article on Infinite Uploads instead of ChatGPT or Google’s AI Overview, then you know we have the solution.
Step 9B: Keep Your Course Videos Private and Your Website Fast

Being Video Cloud by Infinite Uploads, we’re partial to native video uploads. You control who sees your video, when they see it, and how they view it. You upload it and we offload it. This keeps your website fast, your data secure, and the UX for your students clean.
“Infinite Uploads automatically stores your videos in the cloud and delivers them through a global CDN for consistent speed and reliability.” Video Cloud
Remember, you’re creating courses for your school as a business. Tuition is paid either on a course by course basis or semester units. Keeping the video exclusive to your site while also offloading the bandwidth issues to Infinite Uploads Video Cloud is the chef’s kiss of online learning.
Infinite Uploads is the key to scaling your school’s website.
Infinite Uploads is Perfect for:
- Schools who want their website media to not buffer.
- Course creators who want to save on web hosting costs.
- Teachers who need to upload large amounts of media.
- Organizations who need GDPR-compliant video.
- Academies who want ad-free, branded, and self-hosted videos.
“Your videos shouldn’t live on YouTube or slow down your site. Infinite Uploads lets you host, manage, and stream videos directly from WordPress with global delivery. Upload once, and your videos are optimized, transcoded, and streamed from the nearest edge location for fast, reliable playback anywhere.” Infinite Uploads
Step 10: Test Your School’s Website And Course
We cannot emphasize this step enough. It might be a good idea to save this for Day 3 of your website build – if you did steps 1-8 on Day 1 and step 9 on Day 2. Fresh eyes are your best resource when testing.
- This is very important. Look at your website on your phone. Navigate to each page. Read the text and make sure every link works. Ask a friend to do the same.
- Test your website in multiple browsers. How does it look on Edge? Safari? Chrome? Brave?
- Test your website on multiple screens. How does it look on a tablet? 13” MacBook Pro? 75” TV? Not everyone has multiple monitors.
- Test your contact form. Bonus points for adding a custom-thank-you page. Does the sender get email confirmation?
- Test your course registration. Does the student get an email confirmation?
- Send your course link to a friend. Have them run through the course and test all of the buttons.
- Make sure all of the buttons and forms work on your website. Send it to a non-tech person.
Step 11: Go Live
Congratulations! You made it to your last step! You get to go live, promote your courses, and hear the chime from your Stripe app.
Here are the steps for going live.
- If you developed the site in staging, push it to production.
- Make a backup of your site.
- Scrape the social image of your main page with LinkedIn’s Post Inspector.
- Share your new website on Social Media (Facebook, LinkedIn, X (Twitter), Instagram, TikTok, Pinterest, Reddit).
- Change your profile link on social media to your website’s URL. You want to send all traffic from social media to your website so you can track your leads in Google Analytics.
- This is a good time to ensure you set up your site on Google Search Console.
- Bing Webmaster Tools is an important integration now that Microsoft is back to the surface with Edge and AI agents reading these files. Don’t worry, you can log into Bing Webmaster Tools with your GMail account and sync from Google Analytics.
- Also update your Google Maps listing if you have a brick and mortar school as well. This is also a good time to sign up for Bing My Places. You can set it up to sync with Google Maps.
ClikIT lists more considerations for building a WordPress website plus, step-by-step instructions to follow.
Infinite Uploads Lets You Scale As You Grow
Now that you’ve built your school’s website and your first course, you’re sure to write the next set of lessons. Infinite Uploads makes it so easy for an educator to manage their own learning platform – leaving the tech optimization to the software itself.
Small monthly fee. Huge monthly relief.
Pick your video hosting plan today!


