Managing a WordPress website can be great. However, over time, your media library may become a cluttered mess of images, PDFs, and videos. If you have ever spent too long searching for one file you uploaded months ago, you are not the only one.
The issue is that WordPress doesn’t allow you to organize your media into folders by default. That’s the bad news. The good news is there’s an easy way to fix it, and you can create folders manually.
In this post, you’ll learn how to organize your WordPress media library using folders. It’s simple, and you won’t need to mess with any code. Your media library will be clean, searchable, and much easier to manage.
Why Doesn’t WordPress Support Media Folders by Default?
WordPress doesn’t allow you to create folders in the media library. In case you didn’t, now you know.
WordPress sorts your uploaded files into year and month folders. That’s okay for small websites. But if you have numerous images, videos, or PDFs, it quickly becomes a headache.
WordPress stores your uploads inside the wp-content/uploads folder. So, a picture uploaded in you WordPress media library in August 2025 might look like this:
wp-content/uploads/2025/08/image.jpg

The reason is simple. WordPress uses a flat system to store files. This makes the platform faster and easier to run on any theme, plugin, or hosting service. But the downside is you don’t get neat, custom folders.
You can use some WordPress plugins to add folder features that WordPress doesn’t give you naturally. You can create your own folders, drag and drop files, and keep your workspace organized.
Once you set one up, your media library feels way easier to manage. So, you don’t need to browse randomly to find a file, and you’ll know exactly where it lives.
Limitations of the Default WordPress Media Library
Let’s look into some of the restrictions of the WordPress media library. Will focus on the sections where it controls you the most.
- You can’t group files by project or topic (e.g., “Landing Page Assets”).
- Team members upload duplicate files because they can’t find existing ones.
- It slows down publishing because you’re hunting through endless thumbnails.
- Migrating or backing up becomes messy with duplicate or unused media.
Benefits of Organizing Your WordPress Media Library with Folders
A disorganized WordPress media library looks bad and slows down your workflow. The larger your site grows, the more difficult it becomes to find the right image, video, or document.
If you’re wondering whether folders are worth it, here’s why I recommend them:
- Save Time: You don’t waste time scrolling or searching randomly to find your file.
- Better Image SEO: Instead of uploading duplicates, find and reuse optimized images.
- Smoother teamwork: Folders help multiple uploaders stay consistent in teamwork.
- Backups and migrations: Organized folders reduce site migration and restoration errors.
Whether you publish content daily or run occasional campaigns, the time you save in the media library quickly adds up. A tidy media library reduces stress, keeps your site clean, and makes sure you and your team work smarter.
Create Folders in Your WordPress Media Library Using Plugins
Here’s the main part. Let’s create folders in your WordPress media library with a plugin. Using WordPress Plugins is the easiest way to do it. You can install them quickly and get a folder system that WordPress doesn’t offer by default.
Step 1: Choose and Install a Media Library Folder Plugin
First, pick a media management plugin that meets your needs. There are multiple plugins designed specifically to add folder functionality to WordPress. Some popular ones include:
| Plugins | Features | Best For | Price |
|---|---|---|---|
| FileBird | Drag & drop folders, WooCommerce support, bulk organization. | General users | Free |
| Real Media Library | Subfolder support, sorting by author/date, galleries. | Advanced sites | Paid |
| WP Media Folder | Cloud integration (Google Drive, Dropbox), deep sorting. | Large sites | Paid |
| Folders by Premio | Unlimited folders, color coding. | Simplicity lovers | Free |
Since FileBird is beginner-friendly and works well with most themes, I use it to create folders in my WordPress media library.
Here’s how to install it:
- Go to Plugins > Add New in your WordPress dashboard.
- Search for FileBird in the search bar.
- Click Install Now and then Activate.
Step 2: Create Your First WordPress Media Folder
Once the plugin is activated, go to your Media Library (under Media > Library in the dashboard). You’ll notice a new sidebar that lets you create and manage folders.
To create a folder:
- Click the Add New Folder button.
- Give your folder a descriptive name, such as “Blog Images” or “Product Photos.”
- Hit Enter, and your folder will appear in the sidebar.
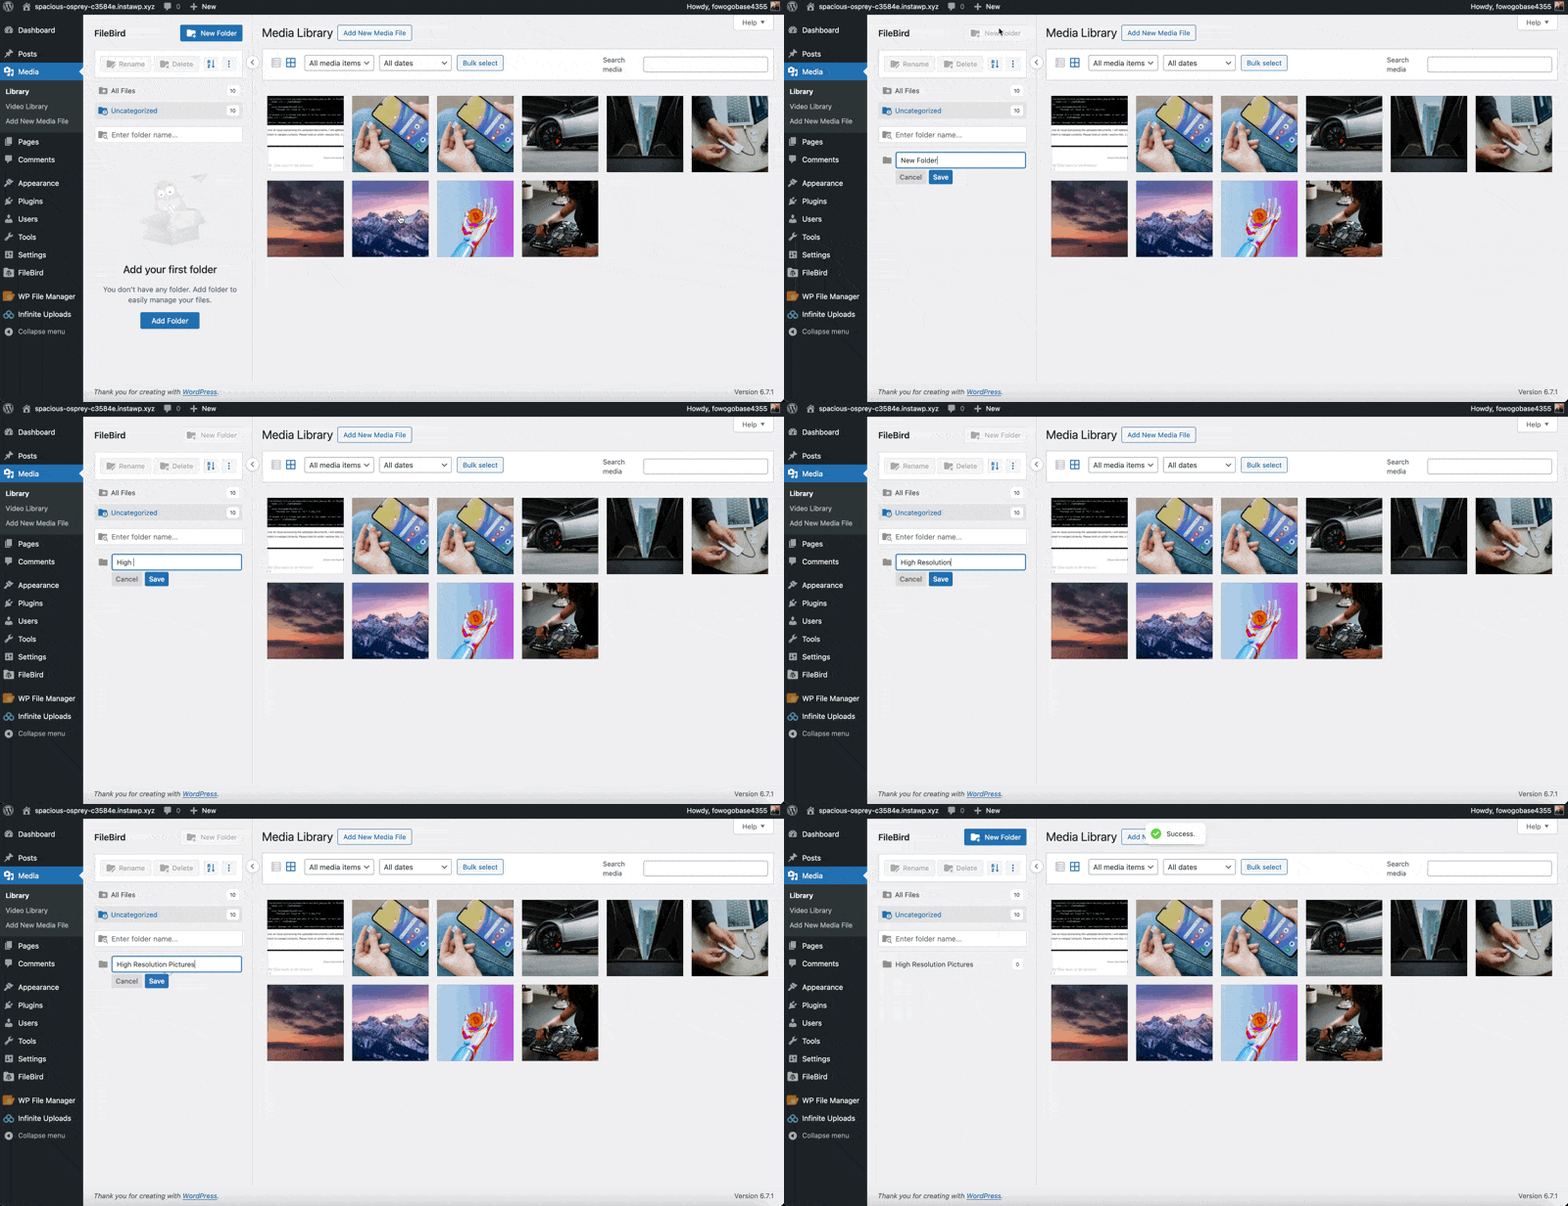
Need subfolders? Right-click on a folder and select Add Subfolder. This is great for breaking down categories further—for example, you could have a “Blog Images” folder with subfolders for each blog category.
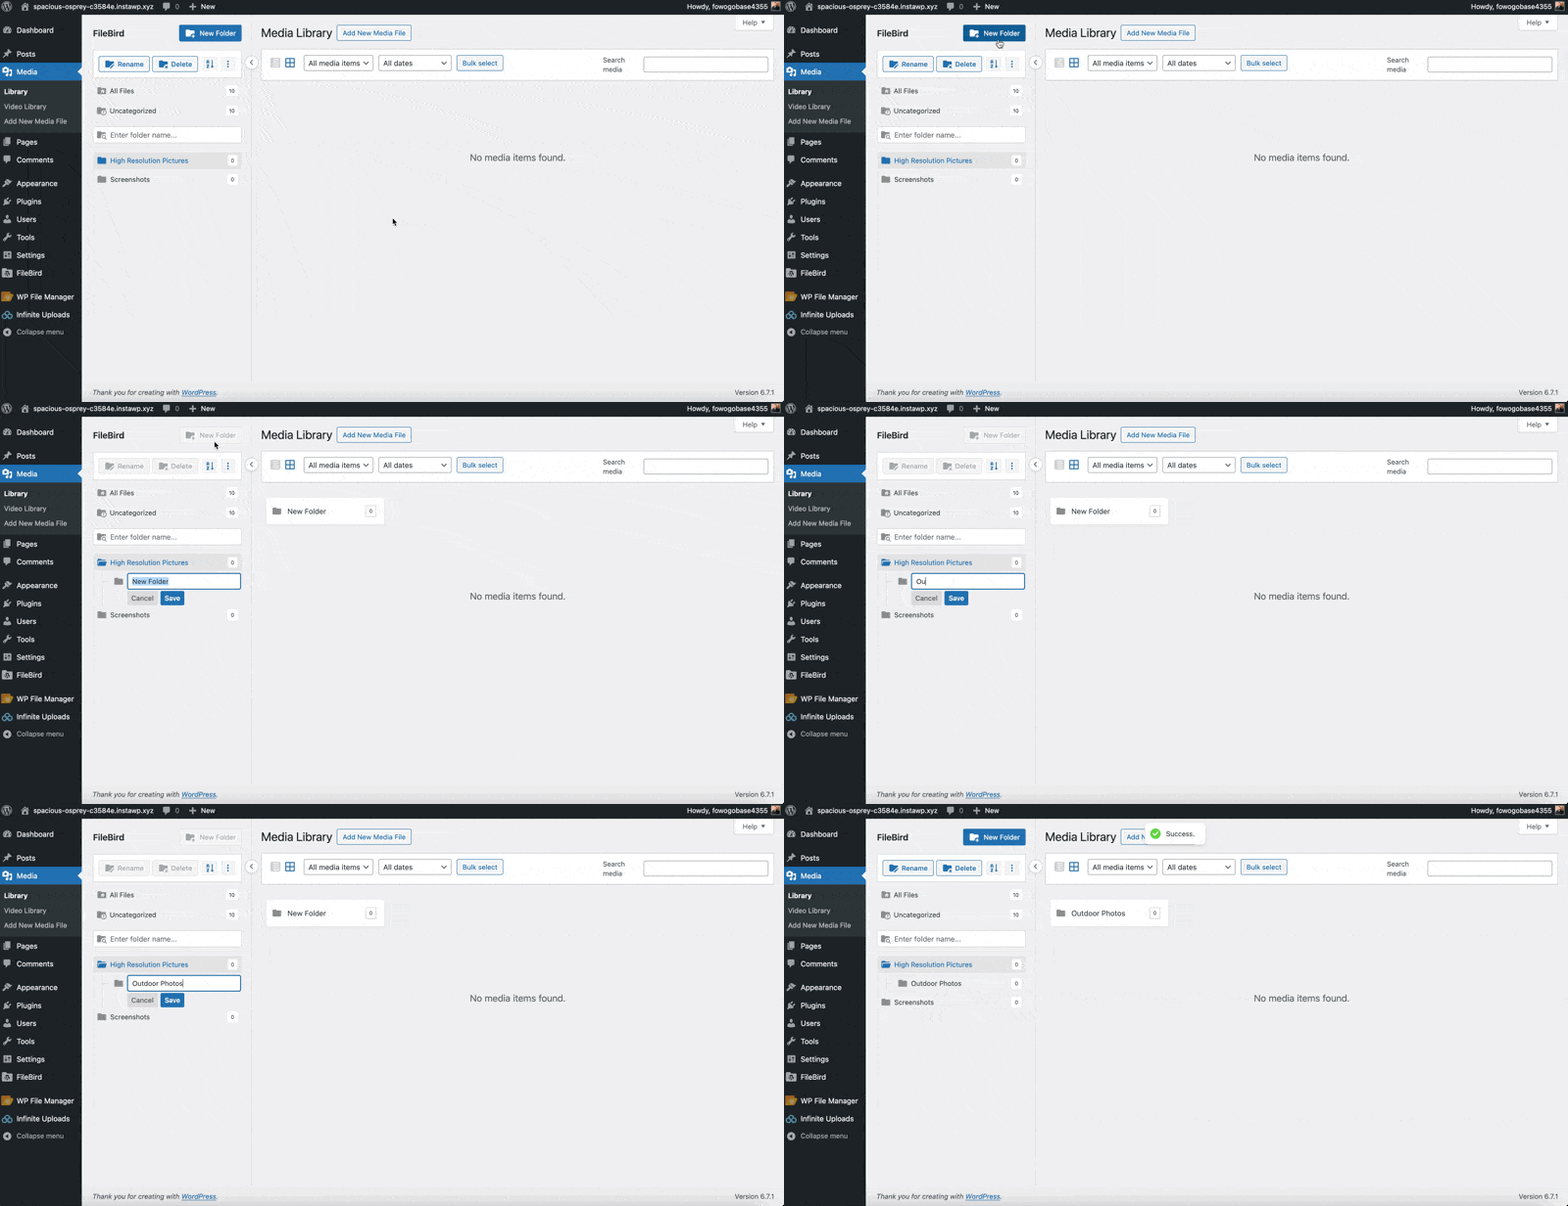
Step 3: Organize Existing Media Files
Once you’ve created folders, it’s time to tidy up.
- Select the files you want to move. Most plugins have a bulk select tool to make this easier.
- Drag and drop the files into your chosen folder.
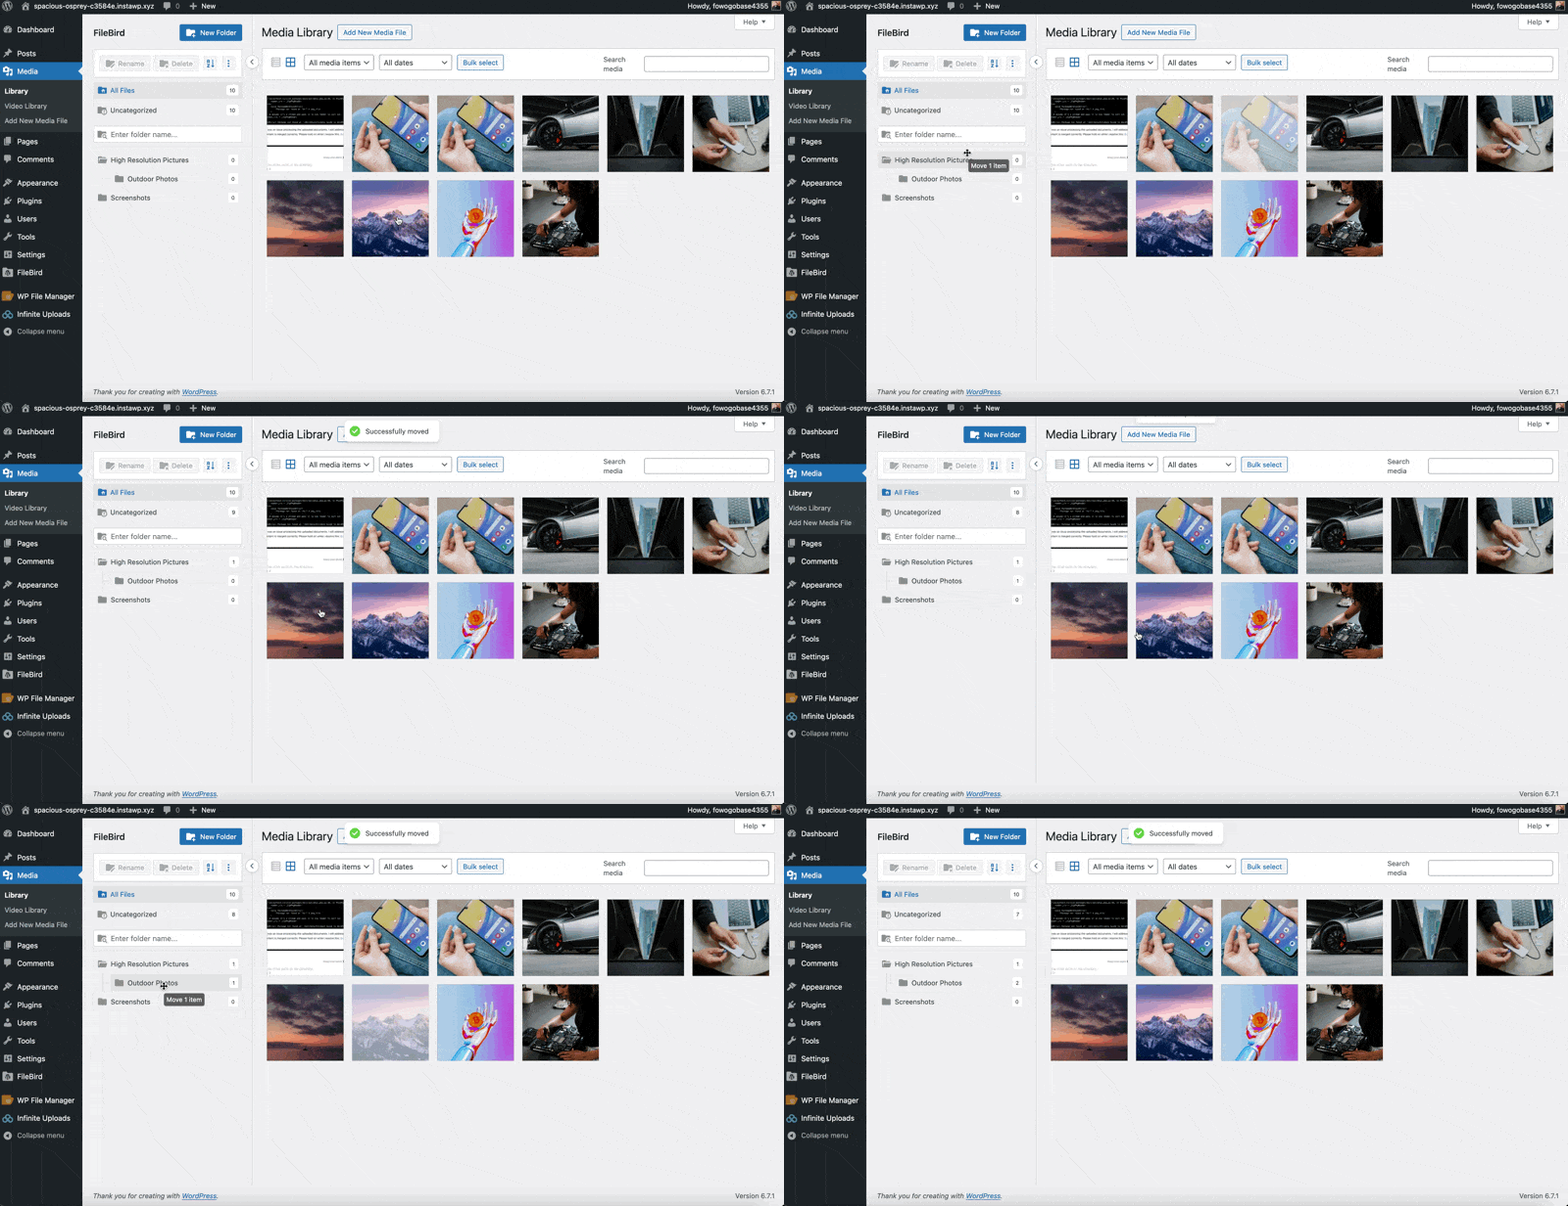
Remember, these are “virtual” folders. They don’t actually move files on your server. Plugins like FileBird or Real Media Library just give you a way to organize files inside the WordPress dashboard.
When you drag a file into a folder, the plugin links it there, but the file itself stays in the same spot in your uploads folder.
Your file URLs never change, so you don’t break links in posts or pages. It also won’t interfere with backups or site migrations, as the folder setup is stored in your WordPress database.
Step 4: Upload Files Directly to Your WordPress Media Folders
Going forward, you can upload new files directly into folders, ensuring your uploaded files are well-organized:
- Select the folder you want to upload to.
- Click the Upload button or drag and drop your files into the media library.
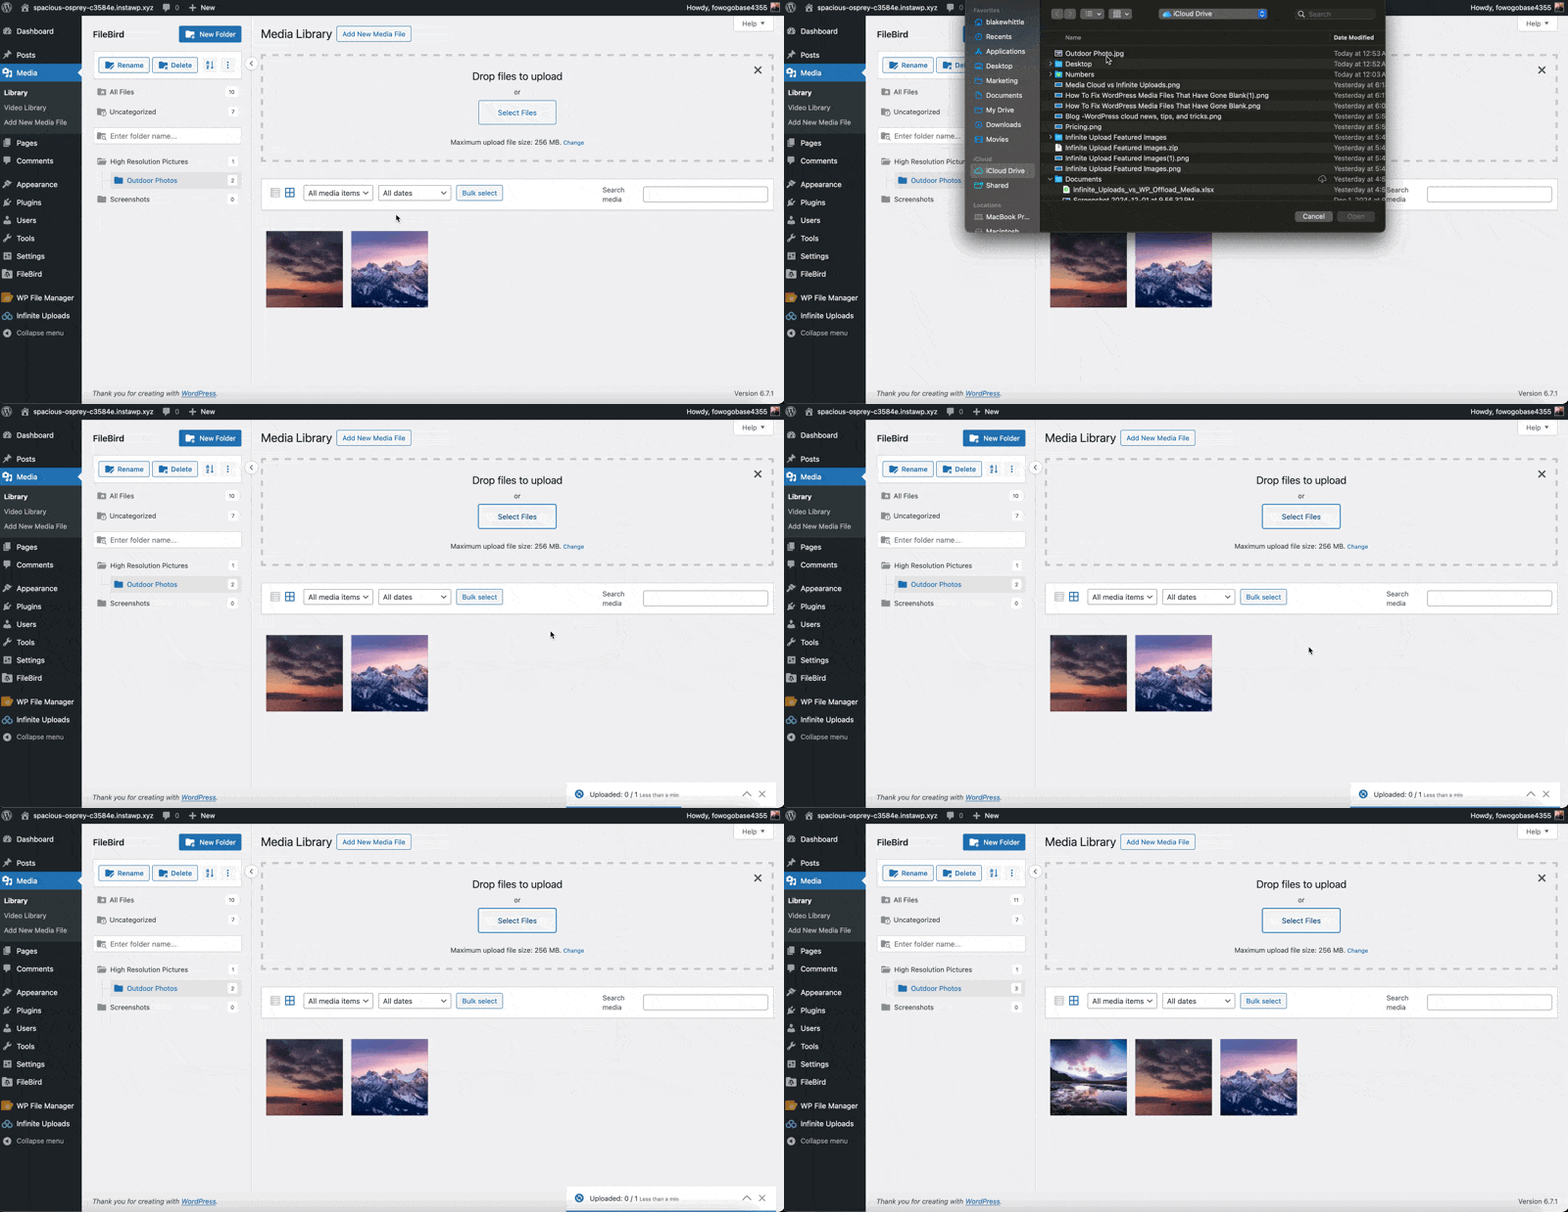
This keeps your library organized from the start, saving you the hassle of moving files later.
Pros and Cons of Creating Folders in WordPress Media Library
Creating folders in WordPress can significantly improve how you manage media files. They add structure and save time, but there are also a few drawbacks you should know before relying on them.
Let me share with you some of the benefits and drawbacks of creating a folder in WordPress.
Pros of Creating Folders in WordPress
- Makes finding files faster and easier.
- Large media libraries stay easier to manage as your site grows.
- Reduces clutter and makes your WordPress media library cleaner.
- Teams can stay consistent by using the same folder setup.
- Most plugins and themes work fine with folder plugins.
Cons of Creating Folders in WordPress
- Requires installing plugins since WordPress doesn’t allow it.
- Some plugins only make “virtual folders” that don’t change server file paths.
- Too many folders or subfolders can get confusing.
- Deleting or moving folders can sometimes break links to images in posts.
Best Practices for Media Organization
Creating folders in the WordPress media library is just the first step toward a cleaner media library. But you also need to get some of your habits right. A few simple maintenance practices can keep your WordPress folders inside the WordPress media library in perfect setup.
- Start early: If your site is new, set up folders right away. It’s easier to stay organized from the start than fix a big mess later.
- Use clear names: Choose folder names that are self-explanatory at a glance. For example, “Homepage Images” is better than “Misc” or “Folder1.”
- Clean up often: Delete unnecessary files and remove empty folders. Tools like Media Cleaner can even find unused files for you.
- Don’t overdo subfolders: Too many nested folders can be confusing. Try to stick with one or two levels.
- Train your team: Make sure everyone in your team knows the folder system.
Optimize WordPress Media Files for Search Engines
Organizing your media library also helps boost your SEO performance and make your site more known and discoverable. Here are a few simple ways to optimize your media files:
Use Descriptive File Names
Search engines look at file names to understand the context. So choose a meaningful name before uploading your image. For example, sydney-skyline-at-sunset.jpg is far better than IMG0001.jpg. Here, the clear names would help search engines understand that the image displays the Sydney skyline at sunset.
Add Alt Text For Images
Always fill in the alt text field in WordPress. Alt text helps screen readers describe images to visually impaired users, and it also tells search engines what the image shows. Keep it concise, accurate, and add a keyword if it fits naturally.
This improves accessibility and can give your page an SEO boost. If we use the previous image, then the alt tag should be, “people watching the Sydney skyline at the time of sunset from the beach.
Compress and Resize Images
Large files slow down your site, and page speed is a ranking factor. Resize images before uploading and pick the right format—JPEG for photos, PNG for graphics with transparency, and WebP for smaller, modern file sizes.
WordPress Plugins like Smush, ShortPixel, or Imagify can also automatically compress files. Optimized images make your site faster and improve the user experience.
Use WordPress Cloud Storage & Media Offloading Solution
You can create folders in your WordPress media library to keep it organized. But it only solves part of the problem. With large videos, PDFs, or images, your website starts performing poorly as your server slows down, and pages take longer to load.
That is where you should focus more on media offloading than media organization. Moving your media files to cloud storage from the hosting servers allows the hosting to breathe freely and improve performance. This reduces server load, improves Time to First Byte (TTFB), and speeds up global delivery.
1. Infinite Uploads

Infinite Uploads connects your WordPress site to its own cloud storage and Content Driven Network (CDN). When you upload a file, it syncs to the Infinite Uploads cloud instead of filling up your wp-content/uploads folder.
Infinite Uploads then updates your WordPress links so files load directly from a global delivery network (CDN) without stressing your hosting servers. So, your website remains smooth and performs stress-free.
Benefits of Infinite Uploads
- Unlimited files and unlimited site connections.
- Reduces hosting disk usage and I/O requests.
- Uses object caching and a distributed CDN for faster retrieval.
- Global CDN with 119+ points of presence and durable storage.
- Simple setup, no technical skills needed.
If you want a larger and faster website without having to set up any technology, Infinite Uploads provides an efficient plug-and-play solution.
2. Amazon S3 + WP Offload Media

Amazon S3 becomes your storage layer when you combine it with WP Offload Media. It stores all your media uploads in an S3 S3 bucket instead of your hosting server.
Then WP Offload Media rewrites your WordPress media URLs to point to S3. Thus, WordPress retrieves the media without any issues.
You can also integrate Amazon CloudFront or another CDN with WP Offload Media. Your media files are cached on edge servers worldwide and ready for faster delivery.
Benefits of Amazon S3 + WP Offload Media
- Bulk offload of the existing library with pause and resume options.
- Virtually unlimited storage and bandwidth.
- Multi-region availability with redundancy for uptime.
- Integrates with CDNs like CloudFront, Cloudflare, and Google CDN.
- Fine-grained access control with AWS Identity and Access Management (IAM).
Combining Amazon S3 and WP Offload Media provides enterprise-grade reliability. But you’ll need to manually configure S3 buckets, IAM permissions, and sometimes DNS. It’s best for large sites where infrastructure control matters.
3. BunnyCDN

BunnyCDN doesn’t replace your WordPress uploads folder. Instead, it mirrors your files to a global network of edge servers. In simple words, it makes copies of your files and places them on servers worldwide.
Once set up, BunnyCDN automatically routes your media URLs to the nearest Bunny server. The original media file stays on your host, but users rarely touch it after the first request.
Benefits of BunnyCDN
- Anycast DNS directs visitors to the closest server.
- Built-in DDoS protection, token authentication, and geo-blocking.
- Smart routing, Perma-Cache, and caching control with edge rules.
- Can serve compressed versions (WebP, Brotli) on the fly.
- Simple dashboard with usage reports, real-time logs, and analytics.
4. Jetpack VideoPress

VideoPress offloads only videos. Instead of storing them in your WordPress uploads folder, the plugin hosts them on Automattic’s global video infrastructure.
VideoPress transcodes the video into multiple resolutions (e.g., 360p, 720p, 1080p) and serves the best version depending on the device and connection speed.
If your website relies heavily on video content, VideoPress takes the stress off your server with a smooth playback experience.
Benefits of Jetpack VideoPress
- Ad-free video hosting with complete branding control.
- High-resolution playback up to 4K with adaptive streaming.
- Adaptive bitrate streaming prevents buffering.
- Automatic video compression keeps quality high and size small.
- No third-party ads or branding, unlike YouTube embeds.
Infinite Uploads = S3 + CloudFront + Offload Media in One
Infinite Uploads is often compared to a combined setup of Amazon S3, CloudFront, and WP Offload Media.
All these tools and features are combined into a single, easy-to-use package. That means you get cloud storage, CDN delivery, and media offloading in a single tool with a much easier learning curve.
Infinite Uploads integrates directly with your WordPress media library and offloads files to the cloud. This not only frees up server space but also speeds up your site by delivering media through a global CDN.
Infinite Uploads works in perfect harmony with media organization plugins, such as FileBird. You can enjoy the benefits of creating a folder with FileBird and using the unlimited cloud storage with Infinite Uploads.
Ultimately, your WordPress media library gets organized into neat folders using FileBird. You optimize your media files for speed and SEO, and store all your assets in the cloud with Infinite Uploads.
So, you remove both WP media library clutter and resolve the storage limit issue. Altogether, no more performance headaches.




0 Comments