
What is a WordPress Featured Image?
A WordPress Featured Image is a visual component that summarizes the whole post, page or custom post type. It’s usually the first image users see when they view your post in a blog feed, on social media or search results. These images are placed at the top of blog posts and pages and act as a visual intro to the content.
Beyond that featured images can also be used in sliders, galleries or as background images in certain parts of your website. They enhance the look and feel of your site, grab the attention of your readers and contribute to your brand. Using featured images effectively not only improves user experience but also SEO as search engines love well organized content with visuals
WordPress Featured Image Sizes
WordPress has powerful tools to manage images on your site. One of the features is the ability to set and customize image sizes for different needs, so your images are performance optimized and look great. Whether you’re working with thumbnails, featured images or full width banners, understanding WordPress image sizes is key to a nice website.
Default WordPress Image Sizes
When you upload an image to WordPress, the platform automatically generates multiple sizes of the image in different sizes. These sizes serve different purposes, so your site loads fast and image quality is preserved. The four default image sizes are:
- Thumbnail Size: 150 x 150 pixels, square size used for post thumbnails or featured images in blog feeds.
- Medium Size: 300 x 300 pixels, used for in-content images that need more detail than thumbnails.
- Large Size: Used for bigger images, perfect for featured images in sliders or hero sections.
- Full Size: The original dimensions of the uploaded image, not modified by WordPress.
Customizing WordPress Featured Image Sizes
If the default sizes don’t fit your needs, WordPress makes it easy to customize them:
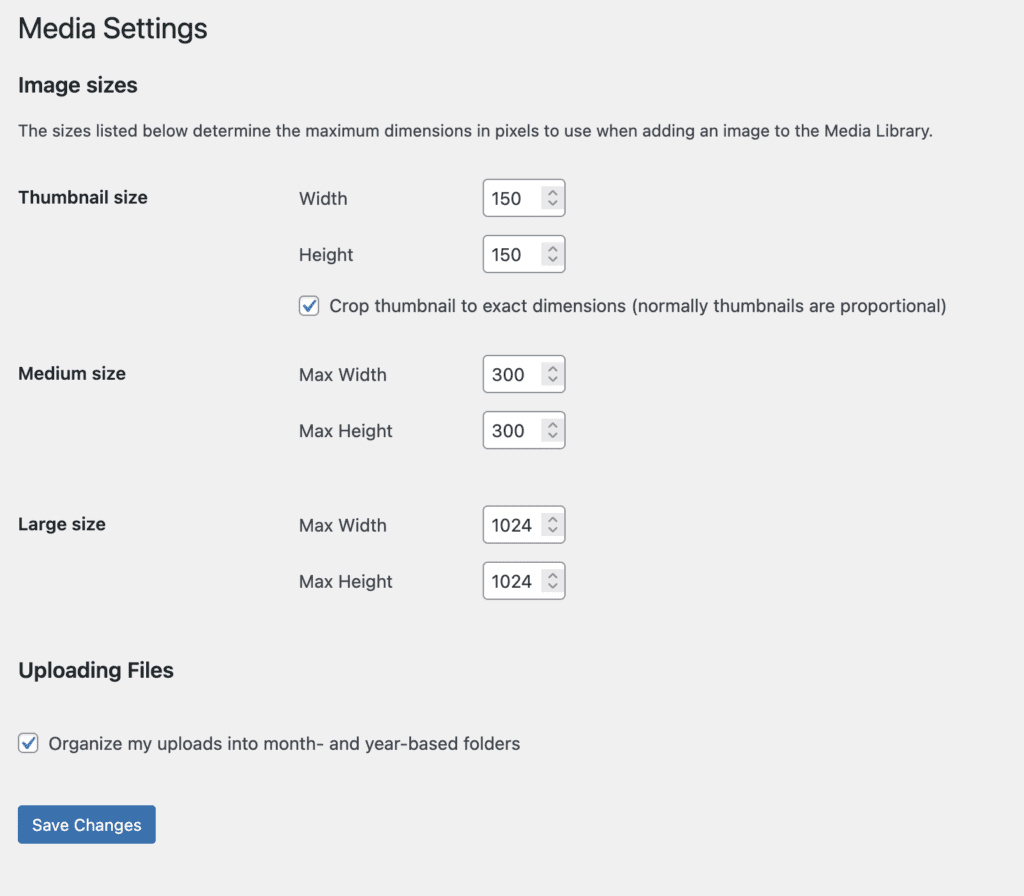
- Go to Settings > Media in your WordPress dashboard.
- Under the “Image Sizes” section you’ll see options to adjust the Thumbnail, Medium and Large image dimensions.
- Change these dimensions to fit your site design. For example if your theme uses wider featured images you might increase the default Large size to 1200 x 600 pixels. nAfter you save the changes any new uploads will use these custom sizes. But existing images won’t be updated automatically—you’ll need a plugin like Regenerate Thumbnails to apply the changes retroactively.
How WordPress Uses Featured Image Sizes
Each WordPress theme handles image sizes differently, often with custom dimensions for specific design elements. For example:
- Thumbnails and Featured Images: These are used in blog feeds or post excerpts, defaulting to 150 x 150 pixels.
- Medium and Large Sizes: Embedded within content, such as images in articles.
- Custom Sizes: Many WordPress themes and plugins generate additional image sizes for sliders, galleries or background images.
Optimizing Images for Your WordPress Site
To ensure performance and image quality consider the following:
- Compress Images: Use plugins like Smush or EWWW Image Optimizer to reduce file sizes without losing quality.
- Responsive Design: Make sure images are mobile friendly by using responsive image attributes automatically handled by WordPress.
- CDN Integration: Speed up image delivery by pairing your site with a CDN service like Infinite Uploads, which optimizes image loading times and reduces server load
How to check your Featured Image on LinkedIn Facebook, and X (Twitter)
Did you know that you can verify how your featured image looks on different social media sites? LinkedIn, Facebook & X (Twitter) allows you to paste in your page link, and it’ll return exactly how it will look when shared online. Use these sites to test & refine your page before it is shared. Use this chance to also double check your title tag.

Best Practices for WordPress Featured Image Sizes
Standard Featured Image Dimensions
The ideal size for WordPress featured images is 1200 x 628 pixels, which is the same size as Facebook and Twitter for optimal sharing. This dimension is a balance between quality and performance so your image looks sharp on both desktop and mobile.
- Why 1200 x 628? This aspect ratio (1.91:1) is visually appealing and follows Open Graph protocols used for social media sharing, so your posts will look great when shared.
Add a Custom WordPress Featured Image Size
For more control, you can define a custom featured image size by editing your theme’s functions.php file. This is especially useful if your theme requires unique dimensions for featured images.
if ( function_exists( 'add_theme_support' ) ) {
    add_theme_support( 'post-thumbnails' );
    set_post_thumbnail_size( 150, 150, true ); // default Featured Image dimensions (cropped)

    // additional image sizes
    add_image_size( 'category-thumb', 300, 9999 ); // 300 pixels wide (and unlimited height)
}
In this example a new image size called category-thumb is created, which is 300 pixels wide and has unlimited height. You can then use this custom size in your theme templates with the_post_thumbnail( ‘category-thumb’ );
Perfect Featured Images
Make Sure Your Featured Image Matches Your Content
Your featured image should introduce the story you’re telling. Consider the following examples:
- A travel blog post might show a view from the destination.
- A recipe page could display the final dish.
- A product review might show the item being reviewed.
Choosing a relevant featured image helps set the context and encourages users to click through. Before choosing an image ask yourself:
- Does it represent the post or page content?
- Will it stand out in a crowded Facebook or LinkedIn feed or search result?
Be Consistent Across Your Website
Consistency is key to a professional looking website. Use the same style for all your featured images, including:
- Size: Use the recommended size of 1200 x 628 pixels for most featured images. This works across social media and WordPress themes.
- Filters and Effects: Use the same color palette, overlays or graphic elements for your brand.
- Typography: If your images have text use the same font and style as your brand.
Tools like Canva or Adobe Express can help you create consistent professional looking graphics with templates.
Design for Impact
A well designed featured image should be eye-catching and functional:
- Use High Quality Images: Avoid pixelated or blurry images. A clear image establishes credibility.
- Use Text Overlays Sparingly: Use overlays for titles or key messages but keep the text short and legible.
- Test on Mobile: Test your featured images on different devices to ensure they scale properly.
Avoid Copyright Issues
Using copyrighted images can get you in trouble and harm your site’s reputation. Instead opt for:
- Royalty-Free Images: Unsplash, Pexels and Pixabay have a huge collection of free high quality images.
- Paid Stock Photos: Use paid services like Shutterstock or Adobe Stock for exclusive images.
- Create Your Own Content: Design custom graphics or take your own photos for full control over your visuals.Check the licensing terms and avoid images labeled “Editorial Use Only” as these are for non-commercial use only.
Optimize Featured Images for Speed
Large image files can slow down your website, affecting user experience and SEO. Optimizing your featured images is crucial:
- Compress Files: Use plugins like Smush or EWWW Image Optimizer to compress images on upload.
- Choose the Right Format: Use JPEG for photos and PNG for graphics with transparency.
- Test Load Times: Tools like Google PageSpeed Insights or GTmetrix will tell you if your images are slowing your site down.
For heavy media sites consider offloading your media library (which includes featured images) to Infinite Uploads.

Infinite Uploads
Easily manage and deliver your media with a seamless solution that simplifies video streaming optimizers storage, and ensures fast, reliable content delivery for your WordPress site.
Purchase PluginAutomate Image Optimization
If you have a large WordPress site automating image optimization can save you time and ensure consistency. Plugins like Smush or ShortPixel:
- Compress images on upload.
- Remove unnecessary metadata.
- Generate WebP versions of images for faster loading.
These plugins combined with Infinite Uploads can integrate seamlessly with WordPress making it easy to manage a media-heavy site.
Featured Images for Search
Add Alt Text
Alt text serves two purposes:
- It helps visually impaired users understand the content of your image using screen readers.
- It gives search engines context about the image so it ranks better in image search results.
Best Practices for Alt Text:
- Keep it descriptive but concise. Example: “Golden sunset over Bali beach with palm trees.”
- Include the post’s primary keyword. For example if your post is about “Bali Travel Tips” you might write: “Golden sunset over a Bali beach – perfect for travel tips.”
- Avoid keyword stuffing. Alt text should flow naturally while including the keyword.Image titles are another way to help search engines understand your content. Titles also appear when users hover over an image so it’s an additional point of engagement.
Tips for Titles:
- Use relevant, keyword-rich titles. For example: “Bali-beach-sunset-travel-tips.jpg”.
- Use dashes not underscores to separate words as search engines interpret dashes as spaces.
- Avoid generic names like “image1.jpg” or “photo123.png.”
Optimize for Social Sharing
Featured images are used in Open Graph tags so when you share your post on social media it will look this way. Optimizing these images ensures they look good across platforms and get clicked.
Social Media Best Practices:
- Use the recommended dimensions for Facebook and Twitter (1200 x 628 pixels).
- Keep the subject centered as some platforms will crop the image.
- Use text overlays sparingly and make sure it’s legible even on small screens.
For advanced customization use a plugin like Yoast SEO to configure Open Graph data and see how your featured image will look on social platforms.
Compress Images
Page load speed is a key ranking factor and large image files can slow down your site. Compressing your featured images is important.
Compressors:
- Smush: Compresses images on upload.
- ShortPixel or TinyPNG: Great for bulk image compression.
- WebP Format: Convert images to WebP for smaller file sizes without loss of quality.
Use Relevant File Names
Search engines consider file names when ranking images. Rename your images before uploading to WordPress.
File Name Best Practices:
- Include relevant keywords. Example: “Bali-beach-sunset-travel-tips.jpg” instead of “IMG_1234.jpg.”
- Use descriptive names that match your post content.
Leverage Structured Data for Images
Adding structured data (schema) helps search engines understand and showcase your images. For example:
- Use ImageObject schema to specify image URL, caption and copyright.
- Use plugins like Schema Pro to implement schema easily.
Optimize for Accessibility
Accessibility improvements not only make your site more inclusive but also align with SEO best practises. Make sure:
- Alt text accurately describes the image for screen readers.* Image captions (if used) for all users.
- Images responsive and displays well on all devices.
Featured Image Checklist
- Alt Text: Add descriptive, keyword-rich alt text for each featured image.
- Titles: Rename files with relevant keywords before uploading.
- Social Media: Resize images to 1200 x 628 pixels and use Open Graph tags.
- Compression: Use Smush or TinyPNG for smaller, faster images.
- File Names: Use clear descriptive names like “SEO-featured-image-tips.jpg.”
- Accessibility: Ensure images are responsive and alt text supports screen readers.
Infinite Uploads
Easily manage and deliver your media with a seamless solution that simplifies video streaming optimizers storage, and ensures fast, reliable content delivery for your WordPress site.
Purchase PluginWordPress Featured Image Issues
WordPress featured images are important for visual appeal, user engagement and SEO. But you may face issues where featured images don’t show up as expected. Let’s look into the common problems and how to fix them.
Featured Image Not Showing Due to Wrong Image Size
If your featured image doesn’t match the size required by your theme or page builder it won’t display.
How to Fix Featured Image Not Showing in WordPress:
- Check Theme Requirements: Go to your theme documentation or settings to find the recommended image size.
- Resize Images: Use Canva or Photoshop to resize your images to match the requirements (e.g., 1200 x 628 pixels for most themes).
- Regenerate Thumbnails: If you’ve changed the size settings in WordPress use the Regenerate Thumbnails plugin to update existing images.
Missing Image File
If the image file is missing from the WordPress Media Library it won’t display as a featured image.
How to Fix It:
- Check the Media Library to confirm the image is uploaded and accessible.
- If the file is missing re-upload the image and reassign it as the featured image for the post or page.
Theme Related Issues
Sometimes it’s the theme. Not all themes display featured images or the feature is disabled.
How to Fix It:
- Check Theme Settings: Go to WordPress Customizer (Appearance > Customize) or your theme settings and ensure featured images are enabled.
- Modify Theme Files: If you’re comfortable with code check your theme’s single.php or content.php file to see if it includes the the_post_thumbnail() function.
- Switch Themes: Test another theme to see if the issue persists. If the image shows up with a different theme it’s likely a problem with the original one.
Plugin Conflicts
Some plugins can conflict with your theme or the way WordPress handles featured images. For example image optimization or lazy loading plugins might block featured images from displaying.
How to Fix It:
- Deactivate all plugins and see if the issue resolves.
- Reactivate plugins one by one to find the conflict.
- Update or replace the problematic plugin.
Lazy Loading
Lazy loading, a feature that delays the loading of images until they’re visible on the screen can sometimes cause featured images not to display correctly.
How to Fix It:
- Disable lazy loading for featured images. If you’re using a plugin like Smush or WP Rocket there’s usually an option to exclude featured images from lazy loading.
- Add this snippet to your theme’s functions.php file to disable lazy loading for featured images:
add_filter('wp_lazy_loading_enabled', '__return_false', 99);Permission Issues
If the folder where your images are stored doesn’t have the correct permission WordPress won’t be able to display the image.
How to Fix It:
- Check your WordPress installation’s wp-content/uploads folder permissions via FTP or your hosting provider’s file manager.
- Ensure folder permissions are set to 755 and files to 644.
- Use Infinite Uploads
Cache Problems
If your website or browser cache is outdated it may not reflect changes to your featured images.
How to Fix It:
- Clear your WordPress cache using plugins like WP Super Cache or W3 Total Cache.
- Clear your browser cache and refresh the page.
Featured Images Show Up on Social Media
Sharing your WordPress pages and posts on social media platforms like WhatsApp, iMessage, Facebook, X, Reddit and more is essential for promoting your content. But it’s frustrating and embarrassing when an incorrectly cropped, unfamiliar or completely wrong thumbnail appears. We’ve all been there. Let’s dive into OpenGraph
Manually setting a featured image in OpenGraph metadata ensures your content looks polished and engaging when shared on social media platforms like Facebook, X (Twitter), WhatsApp and more. Using SEO plugins like Yoast SEO or Rank Math you can override your default WordPress featured image and specify exactly what appears on social feeds. Here’s how to do it step by step:

Manually Setting OpenGraph Images in Yoast Premium:
- Open Your Post or Page Editor:
- Go to the WordPress dashboard and open the post or page where you want to set a custom OpenGraph image.
- Scroll to the Yoast SEO Meta Box:
- Below the post content locate the Yoast SEO section and click on the Social tab.
- Set a Custom Facebook or Twitter Image:
- Under the Facebook Image and Twitter Image fields upload or select the image you want to display when your post is shared.
- Use the recommended dimensions for each platform (e.g. 1200 x 630 pixels for Facebook and 1200 x 675 pixels for X).
- Add Custom Titles and Descriptions (Optional):
- Below the image fields you can add a custom title and description. This text will appear with your image on social platforms so make it attention grabbing and include your post’s primary keyword.
- Save or Update Your Post:
- Click Update or Publish to save your changes. Yoast will now add the necessary OpenGraph tags for social media platforms to pull the correct image.
Manually Setting OpenGraph Images in Rank Math:
- Edit Your Post or Page:
- Open the post or page from the WordPress editor.
- Navigate to the Social Tab in Rank Math:
- Scroll down to the Rank Math settings and click on the Social tab.
- Add a Custom Image for Facebook or X:
- Upload an image for Facebook in the Facebook Thumbnail field and for X in the Twitter Thumbnail field. * Make sure your image dimensions match the platform recommendations. For example a 1200 x 630 pixels image works best for Facebook.
- Preview Your Social Appearance:
- Use Rank Math’s preview option to see exactly how your post will look when shared on social media platforms.
- Save Changes:
- Once your images and metadata are set click Update or Publish to save your changes.
Why Manually Setting OpenGraph Images Matters
By manual specifying your OpenGraph image in SEO plugins you:
- Avoid Missing or Incorrect Thumbnails: Prevent social media platforms from selecting random or blank images.
- Tailor Visuals for Engagement: Choose images that are more visually appealing and optimized for each platform.
- Enhance SEO and Click-Through Rates: Custom titles, descriptions and relevant images help attract clicks and improve visibility.
These small adjustments ensure your WordPress content looks its best when shared across platforms and helps you boost engagement and traffic. Make this part of your workflow for every post and page and you’ll have complete control over your brand’s social media presence!
Plugins to Fix WordPress Featured Image Issues
Featured images are crucial for the aesthetics, engagement and social sharing of your WordPress site. However managing featured images across multiple posts or troubleshooting issues can be tedious. Thankfully there are several WordPress plugins that make it easy to handle, replace or generate featured images efficiently. Here are top plugins to fix common WordPress featured image problems:
Featured Image from URL (FIFU)

Purpose: Use an external image URL as a featured image for a post or page.
If you want to feature images hosted externally—whether they’re from a CDN or another website—Featured Image from URL (FIFU) is the perfect solution. Instead of uploading images to your WordPress Media Library you can use a URL to display the image as the post’s featured image.
Key Features:
- Supports URLs from any image hosting service or external website.
- Displays featured images on social platforms with correct OpenGraph metadata.
- Great for reducing server storage and bandwidth usage.
Best For: Sites using external image hosting or those with limited server resources.
Quick Featured Images
Purpose: Bulk replace or manage featured images across multiple posts and pages.When you need to update or replace featured images for multiple posts at once Quick Featured Images is a lifesaver. This plugin allows you to apply changes in bulk, saving hours of manual updates.
Key Features:
- Bulk assign or replace featured images for existing posts.
- Set rules to automatically assign featured images to new posts.
- Use filters to assign specific images based on post categories, tags or custom post types.
Best For: Bloggers and site managers who need to replace or update featured images for large number of posts.
Infinite Uploads
Easily manage and deliver your media with a seamless solution that simplifies video streaming optimizers storage, and ensures fast, reliable content delivery for your WordPress site.
Purchase PluginDefault Featured Image
Purpose: Assign a default fallback image for posts or pages without a featured image.
To avoid the blank thumbnail Default Featured Image lets you set a fallback image for any post or page without a manually assigned featured image. This ensures all your content displays a thumbnail even if you forget to set one.
Key Features:
- Easy setup in Settings > Media to assign a default image.
- Automatically applies the default image to all posts or pages lacking a featured image.
- Supports themes and plugins that require featured images for consistent display.
Best For: Sites where posts frequently lack a manually assigned featured image.
Auto Featured Image
Purpose: Automatically generate a featured image from the first image in a post.
Auto Featured Image simplifies content creation by eliminating the need to set a featured image. The plugin scans your post content and sets the first image it finds as the featured image.
Key Features:
- Automatically pulls the first image from a post to set as the featured image.
- Works on both new and existing posts.
- Can be used in combination with bulk actions for large updates.
Best For: Content heavy sites or blogs where posts typically include an image but featured images are often forgotten.
How to Choose the Right Plugin
- For External Image Use: Go with Featured Image from URL (FIFU) if you use images hosted outside WordPress.
- For Bulk Management: Quick Featured Images is ideal for making large changes to featured images.
- For Default Images: Choose Default Featured Image if you want a fallback image for posts missing a featured image.
- For Automation: Use Auto Featured Image to automate the process of setting featured images based on post content.
Featured Image Performance and Optimization
Optimizing your WordPress featured images isn’t just about looks—it’s essential for your website’s performance, user experience and SEO. By optimizing and managing your featured images you can reduce load times, improve page speed and ensure your site runs smoothly on mobile devices and slower connections. Here are the steps and tools you can use for featured image optimization:
Offload Media Files to the Cloud
Large image files can strain your hosting resources slowing down your site. Offloading your featured images to a cloud storage and serving them via a Content Delivery Network (CDN) ensures faster load times for users across the globe.
- Plugin Recommendation: Use a tool like Infinite Uploads to offload your media files including featured images to the cloud. This plugin simplifies the process of moving images to a secure cloud server and delivers them through a high-speed CDN with multiple points of presence (PoPs).
- Benefits of Using a CDN:
- Reduces server load by delivering images from a location nearest to the user.
- Improves load times especially for image heavy sites.
- Ensures faster image delivery during high traffic periods.
Compress Images Without Losing Quality
Image compression reduces file size while maintaining visual quality, significantly improves page load times. Compressing your featured images ensures they don’t slow down your website even on mobile networks.
- Plugins for Compression:
- Smush: Automatically compresses images on upload, reduces file size without sacrificing quality.
- ShortPixel: Supports compression and converts images to WebP format for even faster delivery.
- Best Practices:
- Use JPEG for photographs and PNG for images with transparency.
- Optimize image dimensions to match your theme’s requirements (e.g. 1200 x 628 pixels for most featured images).
Use a Caching Plugin
Caching reduces load times by storing frequently accessed data in the user’s browser or on the server. Caching your featured images ensures they don’t need to be reloaded every time a user visits a page.
- Recommended Plugins:
- WP Rocket: A premium caching plugin that optimists images and offers advanced caching options.
- W3 Total Cache: A free plugin with robust features including browser caching for images.
- LiteSpeed Cache: Good for sites hosted on LiteSpeed servers, has built-in image optimization features.
Serve Images in Next-Gen Formats
Modern image formats like WebP and AVIF are smaller in file size than JPEG or PNG without compromising on quality. Serving your featured images in these formats is better.
- Use plugins like ShortPixel or Imagify to convert images to WebP format during upload.
- Test your site with tools like Google PageSpeed Insights to confirm images are served in next-gen formats.
Conclusion
Featured images are an essential part of any WordPress site. They not only look good but also drive engagement, improve SEO and create a memorable user experience. But managing featured images is more than just uploading a nice image—it’s about following best practices and making them performance and accessible.
By following the tips and tools in this guide you can ensure your featured images are always perfect. From setting default and custom OpenGraph images to compressing and offloading your media files using Infinite Uploads, the right approach will improve your site’s speed and functionality. Plus using caching, responsive design and next-gen image formats will further improve your site’s performance and user experience.
Take the time to optimise your featured images and troubleshoot common issues. With the right approach your featured images will always look great, load fast and be professional across all platforms. Start implementing these today and watch your WordPress site become fast, engaging and beautiful.


0 Comments